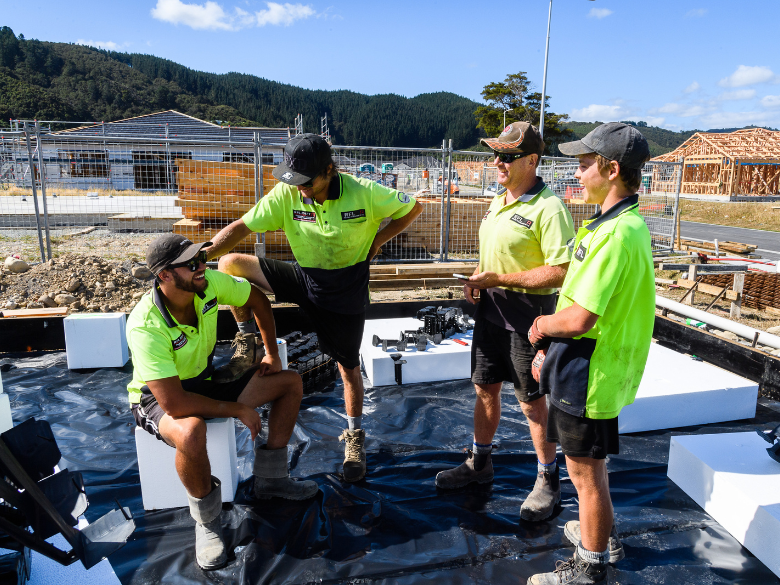
Whether it’s a tractor in the field, a conveyor belt in the packing shed, or a digger on-site, your equipment does the heavy lifting. While these tools make work easier, their power and speed can cause serious harm if things go wrong.
In busy workplaces like Ag, Hort, Manufacturing, and Construction, keeping your gear in top shape isn’t just about avoiding breakdowns, it’s about making sure everyone goes home safe at the end of the day.
Understanding the Risks
Most machines use strong mechanical force to cut, lift, crush, or shape materials. These actions create danger zones where workers can be pulled into moving parts, struck by heavy components, or burned by hot or fast‑moving surfaces. To keep things safe, it’s good practice to:
- Check the Dangers: Use the HazardCo app to identify any hazards and risks
- Keep a List: Use the Hazard Register template in the HazardCo Hub to keep a simple record of the hazards for each machine.
- Simple Instructions (SOPs): Every machine should have a basic “how-to” guide. These cover how to start, use, and turn off the gear safely. You can find easy-to-use templates in the Hub, so you don’t have to start from scratch.
The Daily Pre-Start Check
Work environments in these industries are tough. Environmental factors such as dust, mud, and constant vibration can cause parts to wear out or break unexpectedly. A loose bolt or a damaged hydraulic hose can quickly turn into a major safety issue.
Before you turn the key or flip the switch, do a quick check. Taking a few minutes each morning to ensure the machine is in good working order saves time and prevents accidents. Use the Pre-start Checklist templates in the HazardCo Hub to keep a quick, digital record of your checks.
Training and Confidence
“Having a go” is not ok for heavy machinery. Every person on your team needs to be trained and competent before operating any plant equipment or machinery, especially specialised gear like forklifts or harvesters.
- Keep a Record: Use the Training Register template in the Hub to track who is trained on what and if licenses and refresher training are due. It’s a simple way to ensure only qualified people are behind the controls.
- Supervision: Always make sure newer team members have someone experienced looking out for them until they’ve got the hang of it.
Need a Hand?
Getting your head around machinery safety can feel like a big job, but you don’t have to do it alone. If you need help identifying hazards or setting up your safety records, we’re here to help.
Give HazardCo a call on 0800 555 339.
Running a building business is hard at the best of times. Right now, with fuel prices putting pressure on the industry, a lot of business owners are carrying a weight that goes well beyond the day-to-day. Your crew are likely feeling it too, not just on the job, but at home. Cost-of-living pressures are real, and the same uncertainty that keeps you up at night is affecting the people who show up to work for you every morning.
Mental wellbeing in the trades has come a long way, but when things get stressful, it can still be one of the first things to quietly fall through the cracks. If you’re leading a team, how you’re travelling personally has a direct impact on the people around you. That’s why looking after yourself isn’t a luxury; it’s part of being a good boss.
Check in with yourself first
It’s hard to support your team if you’re running on empty. Some signs that stress might be affecting you:
- Trouble sleeping or constantly waking up with work on your mind
- Feeling irritable or short-tempered more than usual
- Loss of motivation or that flat, “what’s the point” feeling
- Withdrawing from family, mates, or things you normally enjoy
If this sounds familiar, you’re not alone, and it’s worth taking it seriously. Talk to someone you trust, whether that’s a mate, your partner, or your GP.
Keep an eye on your crew
As a business owner, you’re in a unique position to notice when someone on your team isn’t quite themselves. You don’t need to be a counsellor, just a decent human being who pays attention.
Some practical ways to support your team’s mental health:
- Have regular, informal check-ins. It doesn’t have to be a sit-down conversation. A genuine “how are you going?” on the way to site goes a long way.
- Normalise the conversation. If mental health is something you’re willing to talk about openly, your team will feel safer doing the same.
- Notice changes in behaviour. Increased mistakes, lateness, quietness, or short tempers can all be signs that someone is struggling.
- Know your resources. Make sure you and your team know about free support services like the Mates in Construction helpline (1300 642 111). Having these on hand before you need them matters.
- Lead by example. If you take a lunch break, your team will too. Small things send big signals about what’s acceptable in your workplace.
Focus on what’s in your control
Uncertainty breeds anxiety; that’s just human nature. When everything feels like it’s shifting, it helps to anchor yourself to the things you can influence: how you treat your team, the culture you create on site, and the routines that keep your days structured and purposeful.
You don’t have to have all the answers. But showing up, being present, and letting your team know you’ve got their back, that counts for more than you might realise.
Every builder and tradie around the country is navigating the same choppy waters right now. Reach out to your network, talk to your industry peers, and don’t be afraid to ask for help, professionally or personally.
Free support services:
- Mates in Construction: 0800 111 315 | mates.org.nz
- The NEED TO TALK helpline: Call or text 1737 to speak with a trained counsellor
- Depression Helpline: 0800 111 757 or free text 4202
- Alcohol and Drug Helpline: 0800 787 797 or free text 8681
- Samaritans: 0800 726 666
- Lifeline: 0800 543 354 | lifeline.org.nz
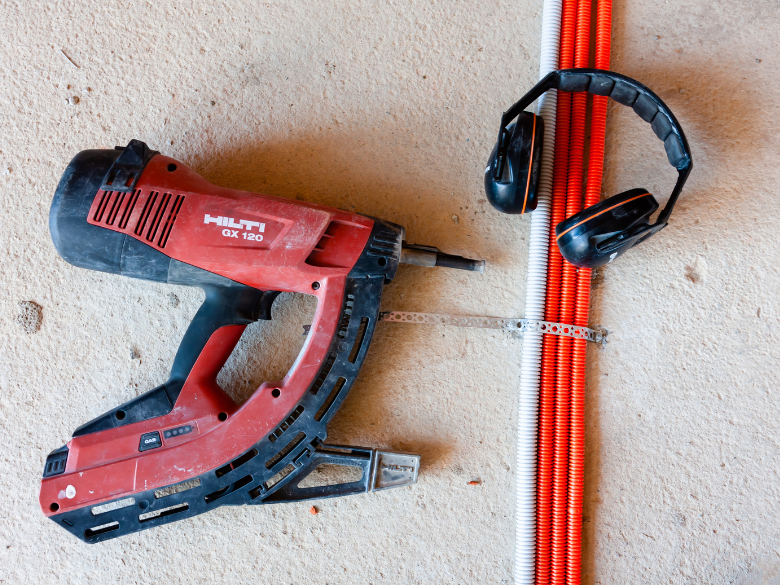
Nail guns are common tools on residential builds. Like any power tool, they can cause serious injuries if not used properly.
Most injuries happen when the gun goes off while being moved or repositioned, when nails hit knots or other nails and bounce back, or when someone is standing in the line of fire. The risk also goes up a lot when the gun is switched to bump fire mode
Choosing the right type of trigger makes a big difference. A full sequential trigger (single shot) is the safest option. It lowers the risk of accidental discharge and double-firing. Bump fire Contact trigger (bump fire or multi-shot) has a much higher injury risk. Most nail gun injuries happen when the bump fire is used.
Sometimes bump fire is needed for high-volume, repetitive work to reduce strain injuries. Only experienced, skilled workers should use it, and extra controls should be put in place to manage the added risk.
Practical tips to reduce risk
Here are simple steps you can take on-site:
- Use full sequential trigger nail guns wherever possible
- When working at height, use a stable platform. Nail guns are designed for two hands and recoil when fired
- Don’t hold the nail gun above shoulder height
- Keep other workers clear of the work area
- Check timber for cracks, splits, or knots before firing
- Carry out pre-start checks. Make sure the actuation mechanism works properly, and the gun is in good condition
- Keep nail guns maintained and have faults repaired by a competent person. Don’t keep using a faulty gun
- Provide the right PPE, such as eye protection, hearing protection, and any other PPE recommended by manufacturers
Training and supervision
Make sure your team knows how to use nail guns safely:
- Provide proper training and instructions
- Develop and follow Safe Operating Procedures
- Follow the manufacturer’s manual, including what to do if the gun jams or malfunctions
- Only trained and competent carpenters should use nail guns
- Apprentices must be supervised
Do your pre-checks. If it’s double-firing, sticking, or not working properly, tag it out and get it fixed. Don’t push on with a dodgy gun.
Nail guns are fast and efficient, but they’re not forgiving. Use the safest trigger, keep people clear, look after your gear, and don’t let untrained workers loose with one. That’s what prevents serious injuries.
If you have any questions, please reach out to the HazardCo Team
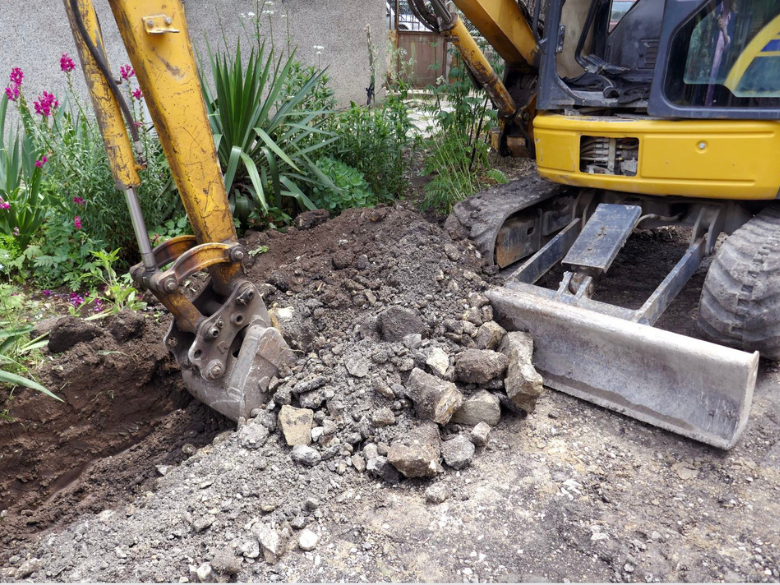
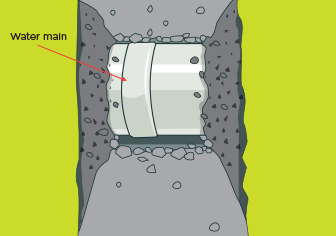
Excavation work means moving or removing soil, rock, or other materials with tools or machinery. You’ll come across it on most construction sites whether you’re building a new home, putting in a retaining wall, or laying underground services. Before you start digging, always check for underground utilities. Taking the time to plan ahead keeps everyone safe and helps avoid costly damage.
Common types of excavation
Here are a few types of excavation you’ll often come across in residential construction:
Cut & Fill (Stripping excavation)
This method is used to clear and level large areas of land. It involves removing unstable material like rock, sand, or topsoil so you’ve got a safe and stable surface to build/work on.
Pile Holes
These are usually dug with a backhoe, drill, or hydro excavator. Always cover and secure pile holes as soon as possible, and make sure only those involved in the work are nearby. Keep an eye on any water buildup and pump it out if needed before continuing work.
Potholing
Potholing is when you dig small holes to locate underground services before starting bigger works. Just make sure those holes are covered or secured when not in use. It’s an easy way to prevent someone from getting hurt.
Trenching
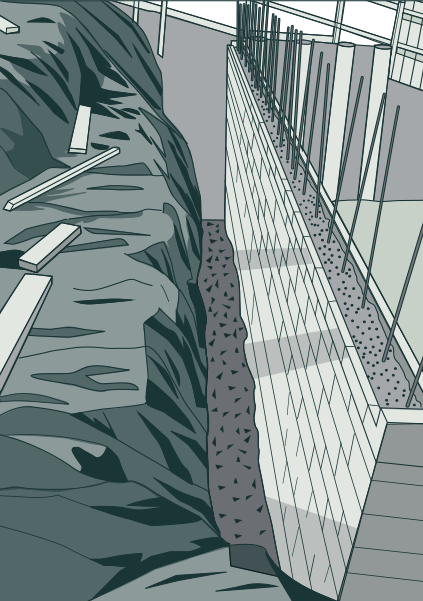
Trenching is used to install or replace underground utilities, build retaining walls, or check what’s under the surface. Trenches are long, narrow, and deeper than they are wide, which means they can be risky. The safest method depends on the depth, soil type, and what’s around it, so always take care and plan it out properly.
Large excavations often need heavy machinery, so make sure you’ve got good traffic management controls in place too.
Managing the risk
Excavation work is classed as high risk, no matter how shallow or deep. Even a small collapse can cause serious injury or damage, so it’s essential to plan ahead and put the right controls in place.
Before you start, complete a Task Analysis in the HazardCo App to help identify, assess, and control the risks associated with your excavation work. It’s also worth checking out WorkSafe NZ’s Good Practice Guidelines for Excavation Safety, which outline what’s expected on-site.
Covering or bridging
When covering holes or bridging shallow trenches:
- Use strong materials such as heavy-duty plywood or steel plates designed for the job.
- Fully cover holes and make sure the covers can’t move or shift.
- Keep walkways clear of slips, trips or other obstructions.
- Check for water hazards after heavy rain, pooled water can cause sidewall collapse and even drowning risks, especially for children.
Barriers and fencing
Keeping your site secure is a must. Think about how long the excavation will be open and what access the public might have.
- If work is left overnight or unattended, use fencing, plating, or backfill to make the area safe.
- Cones, lightweight mesh, or plastic hurdles aren’t enough to protect people from serious risks.
- Use proper safety fencing for long-term or unattended sites – it’s the best way to prevent injuries.
Know your competency level
Before you start any excavation work, make sure you have the right experience and qualifications for the depth you’re working at:
- Up to 1.5m: You should have recent experience supervising or doing excavation work.
- 1.5m – 3m: You’ll need recent experience at these depths and a relevant trade or technical qualification (like a civil engineer or drainlayer).
- 3 – 6m: You’ll need a qualification plus an experienced temporary works designer to confirm the work can be done safely.
Understanding your requirements is essential to keeping yourself and your crew safe.
Need a hand?
You’ll find a list of risk controls for excavation work in the HazardCo App under the Site Review resource, it’s a great way to make sure you’re covering key safety checks.
And if you ever need a hand getting started or want more info, get in touch with the friendly HazardCo team, we’re always here to help keep you and your crew safe.
Summer’s here. Are you ready for the heat?
Longer days and sunshine make it feel like the perfect time to crack into work. But while summer brings good vibes, it also brings its own set of risks. No matter the season, hazards don’t take a break and the hot weather can put extra pressure on your team.
So, what steps are you taking to keep everyone safe from the heat and the harsh summer sun?
Sun safety is just the start
We all know the basics: Slip, Slop, Slap, and Wrap to reduce the risk of sunburn, skin damage and skin cancer. But heat can be just as dangerous. Heat exhaustion, dehydration, and fatigue can creep up quickly if you are not prepared.
Know the signs
Heat exhaustion
Heat exhaustion happens when the body overheats from losing too much water and salt through sweat. If you don’t act fast, it can develop into heat stroke.
Heat stroke
Heat stroke occurs when the body’s temperature hits 39.4°C or higher and the body can no longer cool itself down. This is serious and needs urgent medical attention.
Early signs include heat rash and heat cramps, spotting them early can help prevent things from getting worse.
Check out this helpful resource for symptoms and treatment options for heat-related illnesses.
If you’ve got underlying health conditions that might be affected by extreme heat, make sure someone at work knows.
Manage the risks
Plan ahead
The sun is strongest between 10am and 4pm. Take regular breaks, work in the shade where possible, and consider shifting physically demanding tasks to cooler parts of the day.
Stay hydrated
Drink plenty of water, even if you’re not feeling thirsty. Sweating means you’re losing fluids fast.
Cover up
Slip on a shirt, Slop on sunscreen, Slap on a hat, and Wrap on sunglasses. Even on cloudy days, UV rays can still burn your skin. Here’s another great resource on protecting yourself outdoors.
Listen to your body
Feeling light headed, tired, or short of breath? Take a break. Heat stress builds quickly and can affect how well you think and move and that’s when incidents happen.
Keep the conversation going
Make heat and UV exposure a regular Toolbox topic. This is a simple and effective way to keep your team aware of this often-overlooked hazard. And remember, you can record all your Toolbox meetings easily in the HazardCo App.
If you’ve got questions or want to chat about the risks on your site, our Advisory Team is here to help.
Give us a call on 0800 555 339
Kick off the New Year safely on site
The holidays are done and dusted, and it’s time to ease back into work. Reopening your site is just as important as shutting it down properly and the New Year is the perfect chance to reset, refocus, and set the tone for the year ahead.
After a couple of weeks off, it’s normal for the team to have a bit of Mondayitis. So on day one, take it slow and run through a few key steps to get everyone back on track safely.
Kick-off the year with a Toolbox Meeting
Before anyone gets stuck in, hold a Toolbox meeting:
Go over your SSSP (Site-Specific Safety Plan), walk through emergency procedures, and make sure everyone is fit for work both physically and mentally after the break.
Do a Site Review for new hazards
A lot can change while you’re off-site.
Walk the site and note any new hazards or risks, check fences, gates, and signage are secure and make sure access ways are clear and exclusion zones intact.
Inspect structures, scaffolding, and excavations: Weather and time can take a toll. Check scaffolds, excavations, temporary structures, and anything else that could have shifted, been damaged, or affected by the weather.
Check tools, equipment, and mobile plant: Before the team starts using anything, run inspections and pre-starts.
Make sure tools, gear, and mobile plant are in good working order.
Ease back into it, safety first: Think about a soft start. Give everyone time to check their work areas, ease into the pace, and remember that safety is the priority.
Also keep in mind: after a couple of weeks relaxing in air-con, people may not be ready for full heat exposure straight away.
Heat Safety: Keep Your Team Cool and Safe
Hot weather brings extra risks, so put simple steps in place to keep your team safe and comfortable.
Provide shade and shelter: Set up shade tents or covered areas. For indoor work, open windows or use fans to keep air moving.
Keep everyone hydrated and protected: Make sure workers always have access to drinking water, and encourage sunscreen, lightweight clothing, sunglasses, and sun-protective hats.
Watch for signs of heat-related illness: Everyone reacts differently to heat. Keep an eye out for symptoms like:
- Dizziness, weakness or fatigue
- Nausea or vomiting
- Pale, cool, clammy skin
- Rapid breathing
- Heat cramps
- Dehydration
If someone shows symptoms, provide first aid and seek medical help if needed.
Know when to stop work
If temperatures get extreme, it might be safer to pause work until conditions improve.
Where possible, shift heavy physical tasks to machinery to reduce strain.
Look out for each other
Safety is a team effort. Remind everyone to check in on their mates and report any heat stress symptoms early. Quick action can stop things from getting worse.
Be prepared this summer
Keep your team’s health, safety, and well-being front of mind as you head into the New Year.
Here are some handy resources to help:
If you need support or have questions, our Advisory Team is here to help on 0800 555 339.
If you have any questions you can contact our Advisory Team on 0800 555 339.
The Christmas break is nearly here. You’re probably counting down the days until you can relax and spend some proper time with the family and friends.
But before you lock up for the holidays, let’s make sure your site stays safe and secure. We’re all rushing to finish jobs before shutdown, summer’s heating up, there are Christmas catch ups to organise, and everyone’s tired. That’s when shortcuts start looking tempting.
The good news? A bit of prep now means you can actually enjoy your break without worrying about your site. No phone calls about vandalism. No nasty surprises when you get back. Just a proper holiday.
Your site is more tempting than you think
An empty construction site during the holidays can attract unwanted attention. Locked gates help, but unsecured sites are vulnerable to trespassers, theft, and vandalism.
Your pre-shutdown checklist
- Is your boundary secure? Walk your fence line. Check it’s at least 2 metres high and look for any gaps or weak spots. Make sure all gates are locked properly.
- Can people see it’s dangerous? Your Hazard Board needs to be up to date with current risks and have your contact details clearly visible. Need a new board? You can order one through the HazardCo Hub.
- Have you removed the temptation? Remove ladders from site completely if you can. If you can’t secure them so they can’t be used. Same goes for equipment and machinery, either remove it or hide it out of sight with the keys safely with you.
- Are excavations and openings secure? Any holes or trenches need to be covered and fenced off. Even better, backfill them if you can.
- Is everything safely stacked? Check that materials won’t topple over if there’s strong wind or a summer storm.
- Are hazardous substances stored properly? All your chemicals, fuels, and other nasties need to be locked in proper storage. Best option? Take them off site completely if you can.
- Will temporary structures survive the weather? Give your scaffolding, barriers, and fencing a once over. Summer storms can be brutal.
- Is the power off? Switch off and lock out all temporary power supplies and switchboards.
- Is the site clean? Do a quick tidy up before you go. Empty skip bins, remove waste. A clean site is safer and less attractive to anyone thinking about having a nose around.
Two quick wins using HazardCo
Before you leave: Do a Site Review on the HazardCo App on your last day, that way you’ll know you haven’t missed anything.
When you’re back: Do another Site Review on your first day back. You’ll quickly spot any problems that cropped up while you were away.
Both reviews are saved in your system, so you’ve got a record of your site’s condition before and after shutdown.
If someone’s working over shutdown
If you do need someone on site during the break, you need a lone worker plan in place to make sure they stay safe. Key things to cover:
- Regular check ins (not just once a day, make it frequent)
- First aid kit on site and easily accessible
- Trained first aider present
- No high-risk work
The bottom line
Spending some time before the break working through our site security checklist now means you can hopefully switch off over Christmas. No wondering if you’ve left something unsecured. No phone calls interrupting your downtime.
Need a hand? Give our Advisory team a call on 0800 555 339 or email info@hazardco.com and we can give you some tips on getting your site ready for shutdown.
Have a safe and restful Christmas.
Good health and safety isn’t about stopping work, it’s about having simple, clear processes so everyone understands how to get the job done safely.
When you plan the work and manage the risks, you build a site where safety becomes second nature.
Risk assessments
Before starting any task, pause and look at what could go wrong. A couple of minutes now can prevent someone from getting hurt later.
What good looks like
- Walk the work area before starting
- Identify anything that could cause harm: This includes people, tools, equipment and the environment
- Talk to your team, they’ll spot things you might miss
- Put controls in place before work begins (e.g. barriers, edge protection, correct tools, PPE)
- Reassess if the job or conditions change (new workers, weather change, new equipment)
Best practice tips
- Use the HazardCo app to record hazards and controls as you go
- Take photos to show what you’ve put in place
- Keep it short and clear — risk assessments should be fast and practical
- Update it throughout the day, not just at the start
If it’s not recorded, it’s easy to miss and hard to manage.
Site reviews
A clean, well-run site is a safer site. Regular checks keep everyone on track.
What good looks like
- Walk the site daily.
- Check access ways, housekeeping, scaffolding, excavations, lifting zones
- Look for trip hazards, unsecured materials, poor signage
- Make sure everyone is inducted, briefed, and wearing the right PPE
- Confirm that emergency equipment and first aid are easy to access
- Speak with workers, ask what they’re seeing
Best practice tips
- Use the Site Review tool to record findings and assign actions
- Fix small issues on the spot, don’t leave them for later
- Share the review at toolbox meetings so everyone stays aligned
Good sites don’t just happen, they’re reviewed and improved every day.
Safety is a mindset
Safety isn’t a box to tick, it’s how you work.
- Risks change so check them often
- People change so involve and train your team
- Sites change so review and adapt as you go
When everyone takes action, speaks up, and looks out for each other, safety becomes part of everyday work, not just an extra task.
The hidden danger on-site: Silica dust
Construction sites come with plenty of obvious hazards but some of the most dangerous ones are the ones you can’t see. One of those hidden risks is respirable crystalline silica dust (RCS).
If you’re cutting, grinding, sanding, or polishing materials like concrete, stone, brick, or mortar, there’s a good chance you’re creating RCS dust. And while it might not look like much, breathing it in can cause serious, long-term health problems.
Why silica dust is dangerous
When silica dust gets into your lungs, it can cause a disease called Accelerated Silicosis. This is a fast-acting, life-threatening condition that scars the lungs and makes it harder to breathe over time. The tricky part? You might not even notice symptoms until the damage is already done.
That’s why it’s so important to understand the risk and take simple steps to control it.
How to reduce the risk on-site
WorkSafe New Zealand recommends several ways to reduce exposure and keep your crew safe:
- Use safer materials: Whenever possible, choose materials with a lower silica content.
- Isolate dusty work: Keep dusty work away from others using barriers or enclosed equipment like CNC machines.
- Use the right gear: Fit your tools with dust collectors that have H-class HEPA filters.
- Add water: Wet cutting helps stop dust from becoming airborne in the first place where possible.
- Clean up the right way: Avoid dry sweeping. Use low-pressure water, wet wipes, or a HEPA-filtered vacuum to clean instead.
- Wear proper PPE: Make sure respirators are fit-tested and cleaned after each use. Disposable coveralls or other protective clothing can also help stop dust from going home with you.
- Monitor exposure: Anyone exposed to silica dust should have regular health checks to pick up early signs of damage.
Keep your crew in the know
Most people who develop silicosis didn’t realise they were at risk. That’s why it’s vital to talk about RCS, train your team, and make sure everyone knows how to stay safe.
At the end of the day, the goal is simple: everyone goes home safe and healthy.
Want to learn more about managing silica dust on-site? Get in touch with our friendly team at HazardCo today.We’re here to help you keep health and safety simple.
Slips, trips, and falls, don’t let them take you down!
Slips and trips might seem harmless, but on-site, they’re one of the biggest causes of injuries. A bit of ground clutter, a wet floor, or poor lighting is all it takes to put someone out of action.
Here’s the breakdown:
- Slip – wet or icy surfaces are usually to blame
- Trip – often from tools, cords, or gear left lying around
- Fall – when someone suddenly loses balance
What’s your role?
Businesses must make sure slip and trip hazards are spotted early and dealt with properly. That means checking the site, managing risks, and keeping controls up to scratch.
How to tackle the risks
- Eliminate – plan the site layout to avoid sudden changes in floor levels
- Substitute – install slip-resistant surfaces where you can
- Isolate – block off high-risk areas and use clear signage
- Engineer – treat floors, improve lighting, and sort drainage
- Admin controls – training, cleaning checklists, and good supervision
- PPE – slip-resistant footwear to protect the team
Practical ways to reduce the risk
Reducing slips, trips, and falls starts with simple, practical steps that everyone on site can take.
- Good housekeeping – Keep walkways clear, remove waste quickly, and store gear in the right place.
- Floor checks – Fix uneven ground, repair holes, and mop up spills immediately.
- Lighting – Brighten up darker areas like stairways and access points.
- Weather watch – Use grit, mats, or drainage to deal with rain, ice, or mud.
- Signs and barriers – Put up clear signs when cleaning, or block access to unsafe areas.
- Footwear – Make sure workers have slip-resistant boots suited to the conditions.
- Training – Teach your crew to spot hazards, tidy as they go, and report issues straight away.
- Regular reviews – Walk the site daily and use checklists so nothing gets missed.”
Good housekeeping makes all the difference. The HazardCo App has handy checklists to keep your site tidy and safe.
Don’t wait for a near miss to remind you. Start managing slips and trips today and if you need a hand, the HazardCo team is only a call away.
Looking for something in particular?

Whether it’s a tractor in the field, a conveyor belt in the packing shed, or a digger on-site, your equipment does the heavy lifting. While these tools make work easier, their power and speed ...
Running a building business is hard at the best of times. Right now, with fuel prices putting pressure on the industry, a lot of business owners are carrying a weight that goes well beyond the...
Nail guns are common tools on residential builds. Like any power tool, they can cause serious injuries if not used properly.
Most injuries happen when the gun goes off while being moved or ...
Excavation work means moving or removing soil, rock, or other materials with tools or machinery. You’ll come across it on most construction sites whether you’re building a new home, putting in...

Summer’s here. Are you ready for the heat?
Longer days and sunshine make it feel like the perfect time to crack into work. But while summer brings good vibes, it also brings its own set of ri...

Kick off the New Year safely on site
The holidays are done and dusted, and it’s time to ease back into work. Reopening your site is just as important as shutting it down properly and the New ...

The Christmas break is nearly here. You're probably counting down the days until you can relax and spend some proper time with the family and friends.
But before you lock up for the holiday...

Good health and safety isn’t about stopping work, it’s about having simple, clear processes so everyone understands how to get the job done safely.
When you plan the work and manage the ris...

The hidden danger on-site: Silica dust
Construction sites come with plenty of obvious hazards but some of the most dangerous ones are the ones you can’t see. One of those hidden risks is res...

Slips, trips, and falls, don’t let them take you down!
Slips and trips might seem harmless, but on-site, they’re one of the biggest causes of injuries. A bit of ground clutter, a wet floor,...

Got lone workers on your team? Here’s what you need to know
If someone on your team is working by themselves without other people around and without direct supervision, they’re likely conside...
Take the Hassle Out of Toolbox Meetings
Toolbox meetings don’t need to be a paperwork mission. With the HazardCo App, you can run quick, focused chats straight from your phone – No prep, no p...


