There are a lot of things to keep in mind when setting up Health and Safety on your construction site that it can seem overwhelming. Use this guide as a tool to understand what you need to do from start to end of your build.
Contractor Management
Your obligations as the principal contractor are pretty straightforward. First, you need to make sure contractors have the right skills and experience to do the job, and second, you need to make sure they are going to carry out the work safely. Once they are on board, you also need to monitor if the contractor is following good health and safety practices on-site.
Collecting evidence of this process is important so we recommend putting a system in place so nothing falls through the cracks.
To understand how your contractors manage their Health and Safety it’s important that you talk to your contractors and check that they can show a commitment to keeping workers and visitors safe. This can be demonstrated through clear procedures outlined in their Health and Safety documents, as well as evidence of risk assessments, monitoring work activities, emergency management etc.
The following areas should be included in their Health and Safety Procedures:
- Hazards and risks
- Training and competency
- Emergencies and incidents
- Hazardous substances
- Health monitoring
- Sharing information with workers
- Plant, machinery, and equipment
When you’ve got a lot of contractors coming and going, it can turn into a bit of a headache trying to stay on top of checking all these documents. We’ve created a simple, automated system to nail the pre-qualification of your contractors before you begin working with them, to reduce the risk to your business.
Find out more about HazardCo’s Pre-Qualification Tools here
Setting Up Your Build
When you start a new build, it is important that health and safety is considered and communicated with everyone coming onto site. If this is created at the beginning of your build, and clear direction is provided and shared, it helps to create and foster good safety practices on-site. With HazardCo it’s easy to set up your site by creating a project in the Hub, all you need to do is:
- Provide specific site address details
- Add in general information about the project
- Identify the emergency procedures that will be put in place on-site
- Identify the site hazards and controls that will be used to manage the risks
- Choose the contractors that you will be using for the project
- The SSSP will be sent automatically to those involved and will advise them to use the site-specific QR code to complete a Site Induction when they arrive on-site and scan in/out each day.
We recommend that before the project starts, you should think about setting up site fencing, emergency equipment, toilets, handwashing facilities. Make sure that you set up your HazardCo Hazard Board with the site-specific QR code at the entrance of the build, along with the mandatory government COVID Tracing App QR code.
During Your Build
- Update the HazardCo Hazard Board with any new hazards on-site, and encourage contractors to do the same too
- Use the site-specific QR Code on the HazardCo Hazard Board to get your workers to complete a digital site induction when they arrive on-site for the first time and scan in/out of site each day .This helps to identify who is on-site, and when
- Workers should complete a Risk Assessment on the HazardCo App prior to starting work to make sure their work area is safe and the risks are being managed
- Monitor works occurring on-site using the Site Review feature on the HazardCo App
- For high risk construction work, use the SWMS feature in the HazardCo App. Ensure everyone involved is consulted during the preparation of the SWMS and have read, understood, and will follow the directions provided
- Share and capture what’s happening on-site, and upcoming works with workers through the Toolbox Meeting feature on the HazardCo App
- Record incidents on-site using the HazardCo App. Any incident, illness or near-miss can be recorded. Check out the HazardCo Hub for your Incident Register
- Call our expert Advisory team on 1800 954 702 for any health and safety advice
Health and Safety Evidence
Documentation is a key way of showing that Health and Safety is active on-site and provides evidence in areas like incident investigations and learnings that are shared from these. This can be in either digital or physical format. Use the HazardCo tools on the App and Hub for all your H&S needs.
If you’re not the principal contractor on-site
We recommend that you use the HazardCo App and Hub to manage your on-site health and safety. At the beginning of each day, complete a Risk Assessment on the HazardCo App. This will help identify that the work area is safe and ensure that you have the correct controls in place for common construction hazards.
Remember to use the HazardCo App to report any incidents or near misses on your site. This will notify the HazardCo Advisory Team and we will help guide you through the next steps.
During your job:
- Complete a Risk Assessment on the HazardCo App prior to starting work to make sure their work area is safe and the risks are being managed
- For high risk construction work, make sure that you have read, understood and will follow the directions provided in the SWMS completed by the builder
- Share and capture what’s happening on-site through the Toolbox Meeting feature on the HazardCo App
- Record incidents on-site using the HazardCo App. Any incident, illness or near-miss can be recorded.
- Call Advisory anytime on 1800 954 702 for any health and safety advice
Don’t forget, as part of your membership, you get unlimited access to the HazardCo team.
Phone Support
The support you need from people who know their stuff.
- 24/7 incident support
- Get expert advice from our highly qualified advisory team
- Get full support for your HazardCo system from our customer service team
It’s important to us that you and your crew are kept safe. You know the drill, we’re here to help, so get in touch if there’s anything you need. You can contact us on 1800 954 702 or email info@hazardco.com.
Businesses (PCBUs) that work together will often share health and safety duties in relation to work done. Businesses have a legal duty to consult, cooperate with, and coordinate activities with all other businesses they share overlapping duties with.
What does this mean and how can you ensure that people are not harmed, and you are complying with your legal obligations? Here are some expectations:
- Work with designers to reduce risks
- Set clear health and safety expectations and incorporate these into your agreements with contractors
- Ensure contractors have appropriate health and safety procedures in place
- Prepare a Site Safety Plan for the job and share with all workers and contractors
- Establish health and safety reporting requirements with your contractor. A great tool for this is to use the HazardCo App to complete Risk Assessments, Incident Reports and more.
- Ensure site inductions take place. Coordinate and communicate site rules and procedures to everyone who accesses the work site, this can be done via the HazardCo App by scanning the QR code located on your Hazard Board.
- Set up clear requirements for information sharing for the duration of the project
- Ensure that there is effective communication between all parties (e.g. Toolbox Meetings through the HazardCo App)
- Monitor your workers and/or contractors you hire
The following key steps should be followed by Principal Contractor:
Scope
- Consider health and safety risks prior to selecting contractors.
- Discuss the project with potential contractors to make sure they are capable.
- Document the process and store in the HazardCo Hub.
Prequalify
- Ensure prospective contractors have effective health and safety procedures in place.
- Keep records of contractors’ prequalification.
- Get peace of mind your contractors are good to go, with an automated system to pre-qualify your contractors, check insurance, trade qualifications and more with HazardCo’s Pre-Qualification Tools. Find out more here, or get in touch with the team to find out if it’s right for you.
Select
- Select the contractors based on prequalification outcome and any other factors including availability, skills etc.
Appoint
- Create a Project in the HazardCo Hub, which creates a Site Specific Safety Plan, QR code and Hazard Board. Share the information with contractors.
- Ensure induction expectations are understood by all workers, contractors and visitors.
- Ensure all contractors have reviewed the information and agreement is reached and documented.
Monitor
- Regular communication regarding health and safety performance (e.g. toolbox meetings, site reviews, site inductions etc.)
- Investigate any incidents and follow up on any outstanding issues.
- Regular review during the assignment (e.g. Site Reviews)
Review
- Post contract review – It’s good practice to review the performance of your contractors at the end of the project. Look back at areas that were monitored during the project such as communication, incidents, Site Reviews, etc.
Working along other businesses is a natural part of residential construction. Everyone on-site has a duty to open up the lines of communication and look out for each other.
You can read more about contractor management and overlapping duties here or if you have any questions about working with other businesses on-site, give our expert Advisory Team a call on 1800 954 702.
Health and safety issues arise from a worker raising concern about health and safety at the workplace and that concern remains unresolved after consultation with the worker/s and the PCBU/Employer, it then becomes a health and safety issue
For example, an issue could include a difference in opinion on whether something is a potential risk to health and safety or whether a particular control measure is suitable. .
There are issue resolution requirements in Health and Safety legislation across Australia which outline how a health and safety issue can be resolved, with the aim to agree on how to fix the problem as soon as possible to avoid further dispute or a similar future issue.
PCBUs/Employers are to agree on the issue resolution procedure with their workers. If this does not occur, the default procedure for issue resolution under the relevant State/ Territory WHS Regulations must then be followed.
Who is involved in resolving a work health and safety issue?
Multiple people will be involved in the issue resolution process to ensure adequate consultation and the best outcome occurs. This means it could be:
- the PCBU/Employer with whom the issue has been raised or their representative (e.g. Supervisor)
- any other PCBU (e.g. Contractors, trades) or their representatives who is involved in or potentially impacted by the issue
- where at least one worker in a work group is affected by the issue, their Health and Safety Representative (HSR) (if there is one)
- where at least one worker who is not in a work group is affected by the issue, the worker(s) or their representative.
How to involve representatives in the issue resolution process?
If you or your worker would like to involve representatives in the issue resolution process you are able to do so. A representative does not necessarily need to have health and safety expertise. This could include people such as a designer of a piece of equipment at the workplace, or a person with workplace consultation and negotiation skills. Depending on the nature of the H&S issue, advice or assistance from a range of experts may be required to reach an appropriate and informed resolution between the involved parties.
Things to remember:
- At any stage in the resolution of an issue, a party may nominate a person or organisation to represent or support them while resolving the issue (a ‘representative’).
- Where a party invites a representative to participate in the process, they should notify the other parties of their involvement in a timely manner, especially if their representative is authorised to act on their behalf.
What is an agreed Health and Safety Issue Resolution procedure?
It’s an agreed process or steps for resolving health and safety issues in the workplace.
You can establish an agreed procedure for a workplace. To do this, make sure the procedure:
- Outlines a process or steps for resolving issues
- Relates to health and safety issues only and is not a procedure for other purposes, such as a grievance or complaint procedure.
- Is agreed to, meaning that there has been genuine consultation and agreement between the PCBU/Employer and workers (including HSRS where in place)
- Is documented in writing
- Is communicated to all workers affected by those procedures.
- Include the requirements set out in your State/Territory Legislation.
What is a default Health and Safety Issue Resolution procedure?
The various State/ Territory Regulations set out the default procedure for issue resolution.
The default procedure provides for any party to the issue to commence the procedure by informing the other parties involved that there is an issue to be resolved and the details of the issue.
In attempting to resolve the issue, the default procedure requires the parties to have consider and review relevant matters, including:
- The potential consequence (severity) and likelihood of the risk to workers or other persons
- the number and location of workers and other persons affected by the issue
- the measures, both temporary and permanent, that must be implemented to resolve the issue
- who will be responsible for implementing the resolution measures.
What should happen after an issue has been resolved?
If the issue is resolved, details of the issue and the resolution must be set out in a written agreement, if any party to the issue requests this. If a written agreement is prepared:
- all parties to the issue must be satisfied that it accurately reflects the resolution
- the agreement must be provided to all people involved with the issue
Need Help?
If you’ve got a question about Health and Safety issue resolution or any other health and safety matter, the HazardCo Advisory Team is here to help. Give us a call on 1800 954 702.
There’s an easier way to kick off projects, and it’s with HazardCo. Cut the time you spend on health and safety admin, without cutting corners!
If you’re the principal contractor, you need to have a clear plan in place that everyone is aware of (including your workers and contractors).
Get started with all corners covered:
- Answer a couple of questions and a personalised site-specific safety plan will be automatically generated for you
- Set-up your new project in minutes, add your contractors and the site-specific safety plan can be automatically be sent to them
- Receive site signage for your site
- Get stuck into it
What does my team have to do?
Get tradies, contractors and anyone else stepping foot on-site to download the HazardCo app and you’re all set. Did we mention it’s free to download?
A quick scan of the onsite QR code with the app allows everyone to induct themselves as they turn up.
Start your project the right way. HazardCo will help you to nail your health and safety before you start the build and throughout the life of the project – giving you one less thing to worry about and helping you get your team and contractors home safe at the end of every day.
Our Advisory Team gets a heap of questions about near misses and if they should be recorded. Let’s look at what’s considered a near miss, when they should be recorded and how to go about it.
Near misses matter
Tradies know all too well how regularly they have a close call on-site. But is a “close call” the same as a near miss?
Put simply, yes. A near miss is a dangerous event that occurred without causing personal injury or on-site damage of any kind.
Examples could be anything from a worker tripping over stacked material, dropping a hammer off the scaffold onto the ground, or backing the truck and narrowly missing the boss’s ute. While these seem fairly innocent, they could have been more serious and it’s important that they are all reported. Evaluating what could have been done differently ensures on-site health and safety remains a priority, with near-miss prevention at the top of the list.
Why near misses are often brushed aside
Ignoring a near miss might not seem like a big deal, but it can create a culture on-site where safety isn’t taken seriously. We tend to find that when incidents aren’t reported, these are some of the common reasons why:
- Fear of standing out or blame – near misses may be swept under the rug to avoid blame.
- Leaders don’t set an example – the crew on site won’t report small risks and near misses if managers don’t set a good example by doing it themselves.
- Chalking it up to tradie culture – showcasing a ‘get over it and get on with it’ attitude is leading by poor example. Every near miss matters and the whole team can record them super fast with the HazardCo App.
Near miss reporting – it’s serious business
Look at near miss reporting as a second-chance educational tool. It’s not about blame or singling anyone out, it’s about discussing and emphasising a safer environment on-site. Combined with encouraging near miss reporting, it could mean the difference between change or injury.
Are there patterns in near misses occurring? Are there lots of reports of tools falling from height?
Investigate and ensure controls like the below are in place:
- Can the work be done on the ground?
- Only take the tools you need up at height
- Can work be done with no one below?
- Are toe / kickboards in place on scaffolding?
- Put in place a exclusion zone below the work above
Near misses should never be overlooked. With a swipe and a few taps of the HazardCo App, on-site incident reporting couldn’t be easier. Every tradie deserves to knock off injury-free after a hard day on the tools. Follow up on near misses, discuss the possibilities and take action with HazardCo.
When we hear the term “red flags”, we often think of warning signs when it comes to a particular situation. In the way of a construction site, this could be anything from a messy site, to using out of date H&S paperwork.
Some red flags are more visible or obvious than others, however it’s important to eliminate red flags on your site as they can cause injuries and other issues for you and your crew.
🚩 No site security fencing around perimeter
Why is this a red flag?
Not having a fence around the property perimeter could invite unauthorised entry. If your site isn’t secure, members of the public or children can enter the site, which could lead to injuries, property damage or stolen items.
How can you remove this red flag from your site?
Easy, ensure your site has adequate fencing set-up around the perimeter to prevent unauthorised entry. Take into consideration the height and ensure it’s not only high enough, but also check that the gap at the bottom isn’t too big where people including children could squeeze through underneath.
🚩 Messy site
Why is this a red flag?
A messy site can lead to all sorts of problems. Waste and other objects left lying around can create obstacles for you and your crew. These in turn could cause slip and trip injuries, something we want to avoid!
How can you remove this red flag from your site?
Make sure your team is regularly cleaning up after themselves. Waste materials like cardboard, general rubbish and other lighter material to be placed/stored in such a way to eliminate tripping hazards and prevent them from flying off site especially during strong winds. Having a skip or bins available will make this task easier for everyone to get done.
🚩 No site signage displayed at the front of the site showing the Principal Contractors details
Why is this a red flag?
The site sign provides all of the important details including an after hours contact number. If something happens on site and the principal contractor needs to be contacted, it needs to be easy to find.
How can you remove this red flag from your site?
Display a Principal Contractor sign in a visible location which includes the following information:
- Principal Contractor name
- Principal Contractor number
- Emergency contact details (e.g. site supervisor)
- Project site office (if there is one)
🚩 High risk work being performed on site without adequate controls
Why is this a red flag?
If there is no process for identifying the hazards, assessing the risks and what controls are required for a task, it could pose a significant risk to workers onsite.
How can you remove this red flag from your site?
SWMS are required for all high risk construction work. Ensure SWMS are accessible to the workers performing the task.
It’s important that SWMS are regularly reviewed. If the SWMS is not being followed due to a variation of work or conditions have changed, then work must stop until the SWMS is reviewed and updated.
🚩 Incidents, near misses, injuries and illnesses are not being reported or notified to the right people
Why is this a red flag?
There’s a few reasons why. When people are unaware of incidents or near misses occurring on site, it could lead to the same incident occurring repeatedly. The other issue is that some incidents legally need to be notified to WorkSafe/SafeWork. A fine can be given if this does not occur.
Reporting injuries is also important when it comes to making sure the worker receives appropriate treatment, (e.g. medical treatment) and other support, (e.g. return to work).
How can you remove this red flag from your site?
When incidents, near misses, injuries and illnesses occur on-site it’s important they are reported and investigated. By recording an incident via the HazardCo App, it automatically populates an incident register on your Hub so that all the incidents are recorded in one central location.
Investigations are important as they look at why the incident occurred and what controls can be implemented to prevent them from occurring again.
🚩 Out of date paperwork
Why is this a red flag?
H&S paperwork needs to be kept up to date to help keep your workers safe. If yours is out of date, it could contribute to an incident on-site.
Additionally, lack of H&S documentation (e.g. SWMS) could mean you’re not complying with Legislation so you could be liable for certain prosecutions and/or fines.
How can you remove this red flag from your site?
If you’re old school and don’t mind filling out H&S paperwork by hand, make sure you are using something that is current e.g. SWMS is specific for the high risk task.
If you’re like us and love using a digital system, use the HazardCo App to get your H&S done quickly and simply. All of our features including the SWMS and site review are regularly reviewed and kept up to date including when legislation changes.
If any of these red flags have made you stop and think, we’ve created a list so you can check off everything you need to do as a builder or trade on site.
Click here to download the Builder checklist. If you’re a trade, email our team at info@hazardco.com and we’ll send you the Trade checklist.
Why are concrete/cement/plaster products in the eye such an emergency?
Most cement, lime, mortar, concrete, and plaster products are hazardous substances that contain strong alkalis.

As seen in the image above, alkalis are on the opposite end of the PH scale from acids, however, can be equally as dangerous, being extremely destructive to your eyes. The way you handle the first seconds, minutes, and hours after you get the dry powder or wet mix in your eyes, will determine the outcome.
Alkalis may start their damaging work in your eye without much pain or symptoms, but over time the damage gets worse. So beware, follow the first aid steps below even if you don’t feel pain.
Don’t become one of the statistics: in 2019 – 2020 there were 197 injury claims resulting from chemical or other substances to the eye.
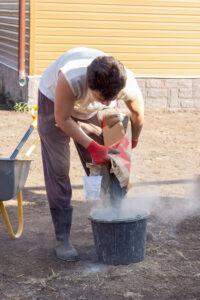
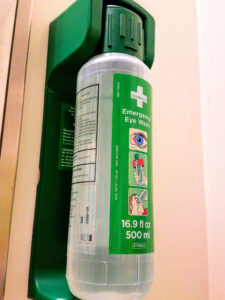
What is the First Aid treatment if I get concrete/cement products in my eye?
Every second counts! Run to the closest tap, eye wash station or water bottle and start flushing your eye. You are aiming to dilute the alkali to lessen the damage.
Wash your face and hands, you don’t want to get more cement product in your eyes. Flush your eye with a steady stream of running water. Let it pour into your eye while lifting both eyelids to rinse out all the cement granules underneath. Do not reuse the water and do not let contaminated water run into the unaffected eye.
- Do not rub your eye.
- Remove contact lenses as soon as possible.
- Continue flushing while you or someone else calls 000, or the Poisons Information Centre on 131 126 for instructions. Have your concrete/cement/plaster Safety Data Sheet handy, as the medical services will base their instructions on the product information in the SDS (for instance, the higher the pH of the product, the longer you need to flush the eye).
- You must see a doctor urgently when an alkali has entered your eye. Continue flushing the eye en route to the medical centre. The doctor will continue flushing your eye until its pH is back to normal. Take the SDS along with you.
What will happen if I do not flush my eye, or stop too early?
If you do not flush your eye, or stop before you are told to do so, you may suffer from permanent eye damage, dry eyes, vision loss and more.
How can I protect my eyes?
- Training: everyone on-site should know about the risk, prevention, and First Aid treatment of cement/concrete/plaster products in the eye.
- Do not touch your eyes when working with chemicals
- Wear strong gloves whilst handling material. Remove gloves and wash hands prior to eating
- Nitrile or chemical-resistant gloves are best
- Wear sealed safety goggles to protect against dry cement/concrete/plaster dust, for instance when mixing, and when the risk of wet splashing is high.
- Wear safety glasses when the risk of wet splashing is low.
- Have an eye rinse station at hand and know the location of the nearest tap.
You can create a Hazardous Substances Register using the template available in your HazardCo hub. You can attach the SDS’s to the register and share it with your team.
If you have an incident where someone gets cement/concrete in their eye, remember to report this as an incident in the HazardCo App. This will automatically be added to your incident register in the HazardCo Hub, and the Advisory team will be in touch with you to discuss next steps if it is deemed to be notifiable.
For questions or support, contact the friendly advisory team at HazardCo on 1800 954 702 or info@hazardco.com.
Timber frame standing and truss erection can be back-breaking work! It is often high risk work with some serious potential injuries. We recommend these three steps are completed prior to every install. Ensure that everyone understands the process and their role, from when frames and trusses arrive on-site all the way through to standing.
Here are 3 recommendations to ensure that your site is safer during the arrival and installation of frames and trusses.
1) Risk Assessment and Safe Work Method Statement
The development of Risk Assessments and SWMS are crucial to your workers to ensure their safety throughout the build. To make these processes easy, you can complete these on the HazardCo App.
Some things to think about when creating a Risk Assessment and SWMS for frame and truss delivery and erection are:
Is the work area secure?
Clients, visitors, and members of the public cannot enter the area and workers are aware that they should only enter if they are required for the tasks.
Have all site inductions been carried out and an emergency plan developed for any at height work?
Have all workers who work at height been trained to do so? Is access to height suitable and is fall protection in place?
Have all workers been provided with the correct PPE? Are all tools and equipment available and in suitable working order for the task?
The purpose of a SWMS is to go into detail for each of the tasks to be carried out. Thinking about the hazards at each step and how they can be appropriately controlled.
You should think about:
- The delivery of frames and trusses
- Frame standing
- Truss setting
Prior to work starting, workers should be involved in developing a SWMS. Consulting workers is important so they understand the detail of the SWMS and what they are required to do to implement and maintain risk controls. Sharing information and using the knowledge and experience of workers will help make sure the work is performed safely and in line with the SWMS.
On paper, this sounds like a lot of work – but it is made simple by using the HazardCo App, and using SWMS templates that you can save as templates and amend again and again. You’re not having to start from the beginning for tasks that you complete regularly. Do remember to check over your templates before approving them as different sites can present different hazards that you don’t want to miss, (overhead power lines as an example).
2) Working safely at height
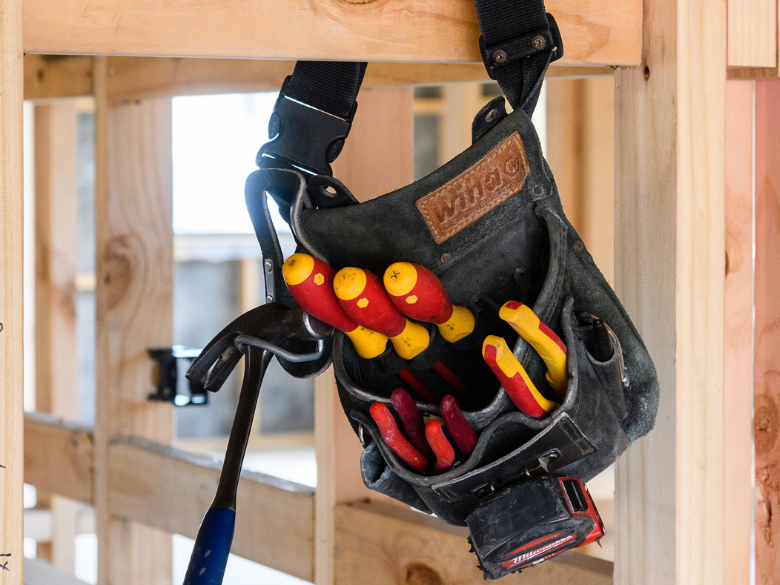
When working at height, either on a second story or setting trusses you need to ensure that your workers are safe, not just from falling, but from tools, equipment, or materials falling too.
Scaffolding
Once the lower level frames have been stood/braced appropriately, safe working platforms should be installed such as scaffolding. Scaffolding over 4m must be erected by a licensed scaffolder and all scaffolding should be checked by a competent person regularly.
Edge protection
If the potential of a fall cannot be eliminated when working on a roof, some form of edge protection should be used to isolate workers from a fall. This includes working on single-story buildings and structures. Using the existing scaffolding as edge protection is often the simplest solution. If this is not practicable, then elevating work platforms or temporary work platforms should be used. Toe boards should be fixed to temporary edge protection as a way of containing all materials, including debris and loose tools.
3) Traffic Management Plan
Worksite traffic can be a major cause of harm on work sites. When it’s close to having your frames and trusses delivered to site and you’re considering dates with the delivery company, it is essential to communicate the traffic management plan with them. This provides the company and drivers involved with a clear picture of how the site has been structured and can assist the delivery company in selecting the correct sized vehicle for the delivery, taking into account the site size and structure.
Ensuring that you implement the above can prevent many injuries on site, as well as regular toolboxes, making plans for ‘what if’ situations (rescue plans) and discussing these with your workers to keep them alert so they’ll know what to do if an incident occurs on-site.
For some useful information on the safe installation of roof trusses and framing please view these resources:
WorkSafe Victoria: Safe erection of roof trusses
WorkSafe Victoria: Preparing to erect timber wall frames
SafeWork Australia Managing the risks of falls in housing construction
When it comes to incidents, a common misconception is that you need to report incidents to HazardCo immediately. This is not the case. Reporting to HazardCo can often happen later once details of the incident have been established. The only time an incident should be reported immediately is when it falls under the criteria of being a notifiable incident, which means it needs to be reported to the Regulator (WorkSafe/SafeWork).
The HazardCo Safety Advisory team assesses all incidents that get reported via the ‘Report an Incident’ function on the HazardCo App. If the incident is notifiable to the Regulator, we will contact you to provide support, determine further details and ensure that the appropriate steps have been taken.
Reporting an incident on the HazardCo App
- Go to ‘Report an Incident’ on the HazardCo App to create a new record
- Select the site location where the incident occurred
- Select the date that the incident occurred on
- List the people that were involved in the incident
- Select the type of incident (near miss, injury, illness, other, incident)
- Select the treatment received (first aid, medical centre, hospital, unsure, none)
- Describe what happened: This is where you enter initial information about the incident. List the facts that are known so far. Such as :
- what job or activity was being performed at the time.
- What plant, equipment or tools were being used
- What went wrong
- What was the injury or damage (or the potential)
- What happened immediately after the incident
Below is an example of an incident report that could be improved upon and what good reporting looks like.
Initial incident report Description
Geoff hurt his leg.
What’s wrong with it?
This tells us nothing about Geoff’s injury, how he is or how it happened.
What does good reporting look like
Geoff hurt his leg whilst carrying timber planks around the site by himself. The load he was carrying was awkward and there were star pickets uncapped near where he was walking. Geoff scraped his leg on one of the uncapped start pickets and dropped the timber. He suffered a graze to the back of his right leg. Geoff was checked over by Bob, a first aider. The grace was cleaned and a band-aid was applied to his graze. Geoff rested for a few minutes and was able to return to work.
What’s good about it?
See how good reporting tells us everything that we need to know about the incident, only includes the facts, and can still be done in a quick and easy way. The summary provided key information such as:
- What Geoff was doing prior/during the incident
- What went wrong
- What injury was sustained
- What occured after the incident and if applicable, what the treatment was
Need Help?
Reach out to HazardCo and speak to one of our expert Health and Safety Advisors if you have any questions or need support for incidents or near misses on your site. You can contact us on 1800 954 702.
Using machinery and equipment for work on-site puts workers in close contact with powerful and fast moving tools. This makes getting the job done easier and more efficient but it does also present some risks to workers health and safety. If a worker comes into contact with machinery or equipment in an unsafe way, it can cause significant harm or injury. It is common practice to use guarding on machinery and equipment to create a barrier between the workers and the moving parts that can cause harm or injury.
Common risks and Hazards
Machinery and equipment guarding is designed to eliminate or minimise the risk of workers being harmed while completing their work. It is important to assess the hazards and risks involved with all the machinery and equipment used in the workplace. If machinery and equipment is not guarded properly, workers can sustain significant injuries due to coming in contact with moving parts.
Some common injuries are:
- Cuts
- Burns
- Electric Shocks
- Degloving
- Amputations
Because there is potential for serious harm when using machinery and equipment, it is necessary to plan a safe approach when conducting a job. This will help identify the hazards of working with machinery and equipment.
The hazard management process includes:
- Identifying hazards
- Assessing the hazard – decide if the identified hazards are significant
- Assessing the risk – decide how likely and seriously a worker could be harmed
- Controlling the hazard – either by eliminating, isolating or minimising the hazard
- Regularly reviewing and monitoring the hazards and risks.
- Create safe working methods like Standard Operating Procedures (SOP)
Choosing the right guarding
There are many different types of guards that can be used to protect workers from being harmed when using machinery and equipment. Here are some common types of guarding and examples of when they are used:
- Fixed – Screwed or fixed in place guarding to protect users from hazards. – E.g. grinders
- Self closing – the cutting edge only opens to the extent necessary to cut the workpiece E.g. drop saw
- Adjustable – Safety guarding that is movable. The guard is in place to protect the user but moves to allow the function of the tool. E.g. drop saws and skill saws
When choosing a guard, It is important to make sure the guard can actually prevent an operator from reaching into the dangerous parts of machinery and equipment. To make sure the operators are protected from the dangerous parts, the safest guarding must take into account an operator’s ability to reach into or come in contact with moving parts.
There are many different types of guards to choose from. It is important to choose guards that eliminate the potential for harm. If this is not possible, then guards should be chosen that isolate or minimise the risk to workers. It is very important that guarding is not removed or tampered with as this will increase the risk of harm to workers.
Control hierarchy
- Elimination involves removing the risk to health and safety from the work site. It is the most effective risk control and should always be prioritised.
- Minimisation is used when a risk cannot be eliminated. This is done using: substitution, isolation, engineering, administration and PPE.
Training/ Competency
Workers should be trained to competently complete the work they are required to do. Workers should be trained and educated on the purpose and function of the different types of guarding in the workplace. Make sure that workers have the appropriate training, supervision, and qualification (if required) to safely use the necessary machinery and equipment. Keep an up-to-date register of what machinery and equipment workers are trained on and competent in using.
If you have any questions about guarding machinery and equipment, give HazardCo a call on 1800 954 702.
Looking for something in particular?

Kick off the New Year safely on site
The holidays are done and dusted, and it’s time to ease back into work. Reopening your site safely is just as important as shutting it down properly and t...

The Christmas break is nearly here. You're probably counting down the days until you can relax and spend some proper time with the family and friends.
But before you lock up for the holiday...

We’ve heard all sorts of myths and misconceptions when it comes to health and safety. We’re here to debunk some of the more common ones we hear.
H&S admin takes too long on-site...

Got lone workers on your team? Here’s what you need to know
If someone on your team is working by themselves without other people around and without direct supervision, they’re likely conside...
Take the Hassle Out of Toolbox Meetings.
Toolbox meetings don’t need to be a paperwork mission. With the HazardCo App, you can run quick, focused chats straight from your phone. No prep, no p...

Get your team scanning in and out – it’s a no-brainer!
We get it, health and safety chats aren’t always the most exciting. But they are the most important. When everyone on-site takes part,...
Working with heavy machinery and managing traffic on-site can be risky. But with the right checks and planning, we can keep everyone safe.
Daily machinery checks
Before starting work each da...

Digging into the ground might seem straightforward, but excavation work is actually one of the most dangerous parts of construction. That’s why it’s important to plan ahead and put the right s...

When you're able to get back on site after a flood or storm, here are the hazards, risks and control measures you should consider to help reduce the risk of injury and illness to yourself, you...

Dust is a common hazard in the construction industry, especially during demolition or refurbishment. When buildings are demolished they can release materials that create hazardous dust (airbor...

To put it simply, health and safety regulators (WorkSafe / SafeWork) work with you and your workers to keep you safe and healthy. Their main goal is to ensure that across Australia, businesses...

Electricity is essential on construction sites, but if the risks are not managed properly, it can pose serious dangers to people and property. Proper controls must be in place wherever electri...


