Summer’s here. Are you ready for the heat?
Longer days and sunshine make it feel like the perfect time to crack into work. But while summer brings good vibes, it also brings its own set of risks. No matter the season, hazards don’t take a break and the hot weather can put extra pressure on your team.
So, what steps are you taking to keep everyone safe from the heat and sun exposure ?
Sun safety is just the start
We all know the basics: Slip, Slop, Slap, and Wrap to protect against sunburn and skin damage. But heat can be just as dangerous. Heat exhaustion, dehydration, and fatigue can creep up quickly if you’re not prepared.
Know the signs
Heat exhaustion
Heat exhaustion happens when the body overheats from losing too much water and salt through sweat. If you don’t act fast, it can turn into heat stroke.
Heat stroke
Heat stroke occurs when the body can no longer cool itself down, pushing body temperature to 39.4°C or higher. This is serious and needs urgent medical attention.
Heat rash and heat cramps are early warning signs, spotting them early can prevent things from getting worse.
Check out this helpful resource for symptoms and treatment options for heat-related illnesses.
And if you’ve got underlying health conditions that might be affected by extreme heat, make sure your workplace knows.
Manage the risks
Plan ahead
The sun is strongest between 10am and 4pm. Take regular breaks during this time, and wherever possible, schedule tasks in shaded or covered areas.
Stay hydrated
Drink plenty of water, even if you’re not feeling thirsty. Sweating means you’re losing fluids fast.
Cover up
Slip on a shirt, Slop on sunscreen, Slap on a hat, and Wrap on sunglasses. Even on cloudy days, UV rays are still able to burn your skin. Here’s another great resource on protecting yourself outdoors.
Take it easy
Don’t push too hard. Rotate tasks and avoid heavy physical work during peak heat hours.
Listen to your body
Just because the weather is good doesn’t mean you should work longer. Heat and fatigue affect how well you think and move and that’s when incidents happen.
Keep the conversation going
Talking about heat and UV risks at your Toolbox meetings is a simple and effective way to keep your team aware of this often-overlooked hazard. And remember, you can record all your Toolbox meetings easily in the HazardCo App.
If you’ve got questions or want to chat about the risks on your site, our Advisory Team is here to help.
Give us a call on 1800 954 702
Kick off the New Year safely on site
The holidays are done and dusted, and it’s time to ease back into work. Reopening your site safely is just as important as shutting it down properly and the New Year is the perfect chance to reset, refocus, and set the tone for the months ahead.
After a couple of weeks off, it’s normal for the team to have a bit of Mondayitis. So on day one, take it slow and run through a few key steps to get everyone back on track safely.
Start with a kick-off Toolbox Meeting
Before anyone gets stuck in, hold a Toolbox meeting.
Review SSSP (Site-Specific Safety Plan), walk through emergency procedures, and ensure everyone is fit for work and mentally ready after the break.
Do a Site Review for new hazards
A lot can change while you’re off-site.
Walk the site and note any new hazards or risks, check fences and gates, and make sure everything is still secure.
Inspect structures, scaffolding, and excavations
Weather and time can take a toll. Check scaffolds, excavations, temporary structures, and anything else that could have shifted or been damaged while you were away.
Check tools, equipment, and mobile plant
Before the team starts using anything, run inspections and pre-starts. Make sure tools, gear, and mobile plant are in good working condition.
Ease back into it, safety first
Think about a soft start. Give everyone time to check their work areas, ease into the pace, and remember that safety is the priority.
Also keep in mind: after a couple of weeks relaxing in air-con, people may not be ready for full heat exposure straight away.
Heat Safety: Keep Your Team Cool and Safe
Hot weather brings extra risks, so put simple steps in place to keep your team safe and comfortable.
Provide shade and shelter: Set up shade tents or covered areas outdoors. For indoor work, open windows or use fans to keep air moving.
Keep everyone hydrated and protected: Make sure workers always have access to drinking water, and encourage sunscreen, lightweight clothing, sunglasses, and sun-protective hats.
Watch for signs of heat-related illness: Everyone reacts differently to heat. Keep an eye out for symptoms like:
- Dizziness or weakness
- Nausea or vomiting
- Pale, cool, clammy skin
- Rapid breathing
- Heat cramps
- Dehydration
- Confusion, disorientation, or slurred speech
- Heavy sweating
- Loss of consciousness
If someone shows symptoms, provide first aid and seek medical help if needed.
Know when to stop work
If temperatures get extreme, it might be safer to pause work until conditions improve.
Where possible, shift heavy physical tasks to machinery to reduce heat exposure.
Look out for each other
Safety is a team effort. Remind everyone to check in on their mates and report any heat stress symptoms early. Quick action can stop things from getting worse.
Be prepared this summer
Keep your team’s health, safety, and well-being front of mind as you head into the New Year.
Here are some handy resources to help:
If you need support or have questions, our Advisory Team is here to help on 1800 954 702 .
The Christmas break is nearly here. You’re probably counting down the days until you can relax and spend some proper time with the family and friends.
But before you lock up for the holidays, let’s make sure your site stays safe and secure. We’re all rushing to finish jobs before shutdown, summer’s heating up, there are Christmas catch ups to organise, and everyone’s tired. That’s when shortcuts start looking tempting.
The good news? A bit of prep now means you can actually enjoy your break without worrying about your site. No phone calls about vandalism. No nasty surprises when you get back. Just a proper holiday.
Your site is more tempting than you think
An empty construction site during the holidays can attract unwanted attention and can greatly increase the chance of incidents. Locked gates help, but unsecured sites are vulnerable to trespassers, theft, and vandalism.
Your pre-shutdown checklist
- Is your boundary secure? Walk your fence line. Check it’s at least 2 metres high and look for any gaps or weak spots. Make sure all gates are locked properly.
- Can people see it’s dangerous? Your Hazard Board needs to be up to date with current risks and have your contact details clearly visible. Need a new board? You can order one through the HazardCo Hub.
- Have you removed the temptation? If possible remove ladders from site completely. If you can’t, secure them so they can’t be used. Same goes for equipment and machinery, either remove it or hide it out of sight with the keys safely with you.
- Are excavations and openings secure? Any holes or trenches need to be covered and fenced off. Even better, backfill them if you can.
- Is everything safely stacked? Check that materials won’t topple over if there’s strong wind or a summer storm.
- Are hazardous substances stored properly? All your chemicals, fuels, and other nasties need to be locked in proper storage. Best option? Take them off site completely if you can.
- Will temporary structures survive the weather? Give your scaffolding, barriers, and fencing a once over. Summer storms can be brutal.
- Is the power off? Switch off and lock out all temporary power supplies and switchboards.
- Is the site clean? Do a quick tidy up before you go. Empty skip bins, remove waste. A clean site is safer and less attractive to anyone thinking about having a nose around.
Two quick wins using HazardCo
Before you leave: Do a Site Review on the HazardCo App on your last day, that way you’ll know you haven’t missed anything.
When you’re back: Do another Site Review on your first day back. You’ll quickly spot any problems that cropped up while you were away.
Both reviews are saved in your system, so you’ve got a record of your site’s condition before and after shutdown.
If someone’s working over shutdown
If you do need someone on site during the break, you need a lone worker plan in place to make sure they stay safe. Key things to cover:
- Regular check ins (not just once a day, make it frequent)
- First aid kit on-site and easily accessible
- Clear plan for what to do in an emergency and who to contactNo high-risk work activities
The bottom line
Spending some time before the break working through our site security checklist now means you can hopefully switch off over Christmas. No wondering if you’ve left something unsecured. No phone calls interrupting your downtime.
Need a hand? Give our Advisory team a call on 1800 954 702 or email info@hazardco.com and we can give you some tips on getting your site ready for shutdown.
Have a safe and restful Christmas.
We’ve heard all sorts of myths and misconceptions when it comes to health and safety. We’re here to debunk some of the more common ones we hear.
H&S admin takes too long on-site, it slows us down.
Back in the day we’d agree with you on this one, however times have changed. With a digital system (*cough*, HazardCo), you can complete your health and safety quickly and easily.
Did you know our members reduced health and safety admin time by 50% when they switched from paper systems? Our easy to use App will guide you through what needs to be done to ensure you’re on top of your health and safety.
I’m not going to have an incident on site, I’ve been doing this for years and I know what I’m doing.
Just because you haven’t had an incident on-site for a while doesn’t mean it can’t happen. The more often you’re around the same risk, the easier it is to ignore it, but the danger is still there.
Construction sites are always changing, and with every stage of the build, new hazards can show up. That’s why it’s important to regularly check your safety measures and adjust them when needed, so you and your mates can keep working safely.
HazardCo members are proven to be twice as safe as the industry average and helps you to stay on top of your health and safety at all times. Learn about the common incidents on-site and how to reduce the risk.
I don’t need to worry about health and safety because I’m a small builder, the Regulators have bigger fish to fry.
The role of the regulators is to reduce workplace harm. There are still many incidents happening on residential building sites, that is why it remains a big focus for them. The regulators often send out safety alerts about recent issues and risks, like falls from height.
Health and safety isn’t just about following the regulators’ rules, it’s about protecting your workers and others on site. Staying on top of it can mean:
- Everyone gets home safe at the end of the day
- A happier and healthier workplace
- Fewer incidents, which means fewer injury claims, lower costs for your business, and less downtime fixing problems
It’s fine for me to use the same safety plan on all my sites because the houses I build are really similar.
Each Safety Plan (WHS Management Plan / Health and Safety Coordination Plan) must be specific to the site.
Sure, some key hazards and risks will be the same across projects, therefore certain content may remain the same from project to project however, it’s essential that a site specific safety plan is created, reviewed and amended for each project.
It’s up to the contractors and subbies on site to make sure they are safe, it’s not up to me as the building company.
On construction sites, the principal contractor has overall responsibility for managing health and safety, but many businesses and people also share duties, from contractors and suppliers to building owners.
This means tasks like managing risks, consulting workers, providing training, reporting incidents, first aid, and emergency planning must be coordinated between all parties. Everyone involved has a legal duty of care, so it’s essential to consult, cooperate, and communicate clearly.
Setting safety expectations in contracts, preparing a Site Specific Safety Plan (SSSP), carrying out inductions, using tools like the HazardCo App for reporting and monitoring, and holding regular toolbox talks all help ensure workers are protected and legal obligations are met.
Find out more about sharing health and safety duties in construction.
I don’t need to report or investigate near misses, as nothing happened.
A near miss is an incident that could have caused harm but didn’t, and it’s just as important to report and record as an actual injury. Too often these are brushed off, but treating them seriously helps identify risks before they turn into something worse.
By encouraging near miss reporting, businesses can spot patterns, improve safety controls, and build a culture of open conversations about health and safety.
Using tools like the HazardCo App makes reporting quick and easy, adds incidents to a digital register, and allows them to be reviewed and discussed at toolbox meetings.
The more near misses are reported, the better prepared everyone is to prevent serious incidents and keep people safe on-site. Read more about the importance of reporting and recording near misses.
I don’t need to worry about managing ‘Health’ when it comes to Health and Safety on-site.
Health is often overlooked in construction, but it’s one of the biggest reasons workers take time off and businesses face extra costs. Both physical and mental health matter.
Physical risks like heavy lifting, repetitive movements, awkward postures, or long hours can lead to musculoskeletal injuries such as sprains, strains, and back or joint pain. These injuries can build up over time and are the leading cause of workers’ compensation claims.
On top of that, construction workers face health hazards like dust, chemicals, and noise, which is why monitoring workers’ health is so important. Mental health is just as critical, construction workers are at much higher risk of suicide than the general population, and workplaces have a responsibility to manage stress, bullying, and other risks to wellbeing.
Poor health on-site affects not just the worker but also deadlines, team morale, and the bottom line. By planning tasks properly, rotating jobs, using the right equipment, encouraging open conversations, and monitoring risks, businesses can keep workers safe, healthy, and more productive.
Get the best from your team and work safer and healthier. Find out more about the importance of looking after you and your worker’s physical and mental health.
MSDs (Musculoskeletal Disorders) are the most common type of work-related injury in Australia. In fact, over half of all serious workers’ compensation claims in construction back in 2024 were linked to MSDs.
MSDs cause pain in muscles, bones, ligaments, tendons, and nerves. The pain can be mild or so severe that it impacts your day-to-day life.
Why it happens
In construction, the risk of MSDs comes from more than just heavy lifting. Factors include:
- Physical factors: shape and weight of loads, awkward postures, repetitive work, poor site layout.
- Individual factors: age, strength, fitness, diet, health conditions, work habits, mindset.
- Psychosocial factors: stress, time pressure, communication, financial strain.
- Work organisation factors: long hours, lack of breaks, poor planning, not enough help.
Often, physical strain gets most of the attention, but the real picture is bigger. These factors work together, and understanding how they connect is key to preventing injuries.
What helps
The good news? There are simple, proven ways to reduce the risk of MSDs:
- Take micro breaks and change positions
- Rotate tasks
- Warm up and stretch
- Build strength and flexibility
- Plan work properly
- Speak up early if you feel pain
- Manage stress and look after mental health
MSDs are not “just part of the job.” With the right mindset and systems in place, we can prevent them and protect both today’s workers and the next generation.
SafeWork NSW has a free program called PErforM, designed to help businesses reduce MSDs. They run workshops both in-person and online. If you’d like to know more, get in touch with us.
Health in the construction industry is often overlooked, but it has a huge impact on workers and businesses. Physical and mental health issues are among the biggest reasons for time off work and rising workers’ compensation costs across Australia. Ignoring health risks doesn’t just harm individuals, it affects productivity, deadlines, team morale, and a company’s bottom line.
Physical Health Risks
The most common health issue in construction is musculoskeletal injury (MSI), caused by body stressing. These injuries account for over half of lost-time claims in many states, and around 33% of all serious claims nationally. They often result from:
- Heavy lifting or carrying awkward loads
- Repetitive movements
- Awkward body postures
- Using vibrating tools over long periods
- Working without the right equipment or help
Examples of injuries include sprains, strains, bruising, and ongoing pain in the back, shoulders, neck, wrists, or knees. These can happen suddenly (like a pulled muscle) or develop slowly over time.
How to Reduce Physical Health Risks:
- Pre-plan tasks – break jobs into safer steps.
- Use the right equipment – mechanical aids, trolleys, or different tools.
- Rotate tasks – share heavy or repetitive work to avoid overuse injuries.
- Warm up and stretch – treat the body like an athlete would.
- Encourage early reporting – pain or discomfort should be logged before it becomes serious.
- Check site layout – poor design can lead to awkward lifting and unnecessary strain.
Health Monitoring
Construction workers are regularly exposed to hazards that may not cause immediate harm but can create long-term damage. These include, but not limited to:
- Dust and fibres (i.e.silica, asbestos etc.)
- Hazardous chemicals
- Loud noise
- Vibration
What to Do:
- Conduct regular health checks (hearing, lung function, vision) if workers are exposed to risks.
- Provide PPE (masks, ear protection, gloves) and check they’re used and fitted properly.
- Keep exposure levels within safe limits by improving ventilation, reducing noise, or rotating tasks.
Mental Health Risks
Psychological risks (psychosocial hazards) can be just as dangerous. Construction workers are almost twice as likely to die by suicide compared to other employed men, and young workers in other industries. Common risks include:
- Long hours and time pressure
- Bullying, harassment, or aggression
- Lack of support or recognition
- Unclear job roles
- Remote or isolated work
How to Improve Mental Health on Site:
- Talk openly – hold toolbox talks about stress and wellbeing.
- Promote a supportive culture – celebrate wins, recognise hard work, and encourage teamwork.
- Zero tolerance – commit to no bullying, violence, or harassment.
- Improve role clarity – make sure everyone knows what’s expected of them.
- Encourage balance – promote rest breaks and fair hours.
- Support access to help – provide workers with information about support services and encourage speaking up early.
To learn more, we’ve developed a great resource on How to build a mentally healthy work site which provides useful tips.
The Hidden Costs to Business
When a worker is injured or unwell, costs quickly add up. Projects face delays, skills are lost on site, replacement workers may be needed, and insurance costs rise. Poor health also affects morale, making it harder to keep skilled staff.
Actionable Steps for Businesses
To keep your site healthier and safer, try:
- Regular Reviews: Use the HazardCo App for site reviews to spot hazards early.
- Clear Communication: Share site rules, expectations, and updates with all workers.
- Consultation: Ask workers about risks and listen to feedback.
- Incident Reporting: Log every injury, illness, and near miss in the HazardCo App to build a record and identify patterns.
- Toolbox Talks: Use recent incidents or health risks as discussion points.
- Health Monitoring: Arrange checks for high-risk exposures (i.e. noise, dust, chemicals).
- Emergency Planning: Make sure everyone knows what to do if something serious happens.
Physical and mental health are just as important as safety when it comes to protecting workers. By planning ahead, encouraging open reporting, and supporting wellbeing, businesses can prevent injuries, reduce downtime, and build stronger, safer worksites.
If you have any further questions in regards to this topic or need more support, reach out to HazardCo and speak to one of our expert Health and Safety Advisors. You can contact us on 1800 954 702.
* Safe Work Australia reporting period of 2022 – 2023.
Got lone workers on your team? Here’s what you need to know
If someone on your team is working by themselves without other people around and without direct supervision, they’re likely considered a lone worker. Whether it’s a regular thing or just every now and then, it’s your job to make sure they’re safe and supported.
Who counts as a lone worker?
It’s not just remote bush jobs. Lone workers might be team members who:
- Travel solo for work
- Cover big distances
- Work in a remote or isolated spot
- Work by themselves in a separate area on a larger site
- Do night shifts or work odd hours
If this sounds like anyone on your team, there are a few key things you need to think about:
Keep security front of mind
Lone workers may face more risks, both to their own safety and the gear or materials they’re using. You need to make sure they’re prepared and protected. Vulnerable workers like apprentices and inexperienced workers shouldn’t be working alone.
Don’t let them feel isolated
Working solo can be lonely. No banter. No team catch-ups. It takes a toll.
Stay connected with regular check-ins like phone calls, group chats, or video calls. It doesn’t need to be fancy, just make it consistent. A quick “How’s your day going?” can go a long way.
Don’t leave them out of the loop
Just because someone’s working away from the team doesn’t mean they should miss out on training, updates, or important info. Keep the comms flowing so everyone’s in the know – no matter where they are.
Set them up with the right gear
Make sure lone workers have the tools and tech to get the job done safely and stay connected. That includes:
- A phone or two-way radio
- GPS or location tracking if they’re in an isolated area
- The HazardCo App – for easy hazard reporting and support
- PPE that suits the job
- A fully stocked first aid kit (and training on how to give first aid!)
- A fire extinguisher that’s been checked in the last 12 months
Try a buddy system
Simple, but it works. Pair your lone workers with a buddy – someone they can check in with daily. Share location, talk through the day’s work, and have a bit of a yarn. It keeps morale up and helps you respond faster if something’s not right.
Have a plan for emergencies
Use the Emergency Management Plan template in your HazardCo Hub to create a clear plan for how to get help fast if something goes wrong.
Make sure your team knows what the plan is and how it works. Test it out, and keep emergency contact info up to date.
At the end of the day, look out for your lone workers the same way you would if they were right there beside you. A bit of planning and a good dose of communication makes a big difference. Put some restrictions like no High Risk Construction Work will be done by lone workers.
Need help?
If you’re a HazardCo member, the Advisory Team is just a tap away in the app. We’re here to keep things simple and help you keep your team safe, wherever they’re working.
Take the Hassle Out of Toolbox Meetings.
Toolbox meetings don’t need to be a paperwork mission. With the HazardCo App, you can run quick, focused chats straight from your phone. No prep, no printing, no hassle.
The Toolbox Meeting feature guides you through what to cover, step by step, so you can hold the meeting anywhere on-site and tick off all the right boxes as you go. It’s all recorded in the app, and a full report lands in your Hub, ready to download or share with the team.
How often should we have a Toolbox meeting?
- Daily meetings: The gold standard in construction and high-risk sites. Kick off each shift with a short chat on that day’s hazards. These pre-starts keep safety front-of-mind and teams coordinated so everyone knows what’s going on.
- Weekly meetings: Hold more in-depth sessions at least once a week to discuss recent incidents, site safety issues, changes to plans or regulations, new equipment or procedures, and upcoming high-risk work.
- Ad hoc meetings: Jump in when new risks pop up: weather shifts, incidents, or handle issues that can’t wait.
Keeping toolbox meetings regular boosts safety in three big ways: they keep safety top of mind with frequent check-ins, help build a strong culture where everyone’s looking out for each other, and give you the chance to spot and fix hazards before they turn into incidents.
What to cover in a Toolbox meeting:
Stuck for ideas on what to talk about? Here’s some great starting points:
- Today’s tasks and risks
- Weather conditions
- PPE requirements
- Recent incidents or near misses
- Any changes on-site
- Questions from the team
Keep your toolbox meetings interactive by getting the crew involved, it makes a big difference. Ask for feedback at the end of each chat to see what’s working (and what’s not). Encourage the team to speak up about any issues they’ve spotted on-site. When everyone has a voice, safety becomes a team effort, not just another box to tick.
Cool tip to save you time: Use your phone’s voice-to-text tool to speak your notes out loud (just look for the little mic on your keyboard). You can even snap a quick photo to record who was there.
Working solo? You can still use the App toolbox feature to log safety convos with other tradies or subbies. Every chat counts.
And remember, the Toolbox Meeting feature isn’t just for toolboxes. Use it for pre-starts, safety meetings, or committee catch-ups too.
Keeping your site safe starts with good conversations – and with HazardCo in your hands, they’re easier than ever.
Get your team scanning in and out – it’s a no-brainer!
We get it, health and safety chats aren’t always the most exciting. But they are the most important. When everyone on-site takes part, it makes a big difference. And the easiest place to start? Get your team and subbies scanning in and out of site each day.
Your HazardCo QR code (on your Hazard Board) makes it quick and easy and the benefits stack up:
- You’ll always know who’s on-site – even if you’re not, the info is live in your app and saved to your Hub in real-time, so you can check back anytime.
- Productivity boost – tracking trades on-site helps with timesheets and planning.
- First-time users complete a site induction – so they’re across emergency contacts and safety rules from the get-go.
- Access to your Site Specific Safety Plan (SSSP) – key hazards, emergency plans, and control measures all in one place.
- Using Project Plus? This unlocks the app for workers to upload SWMS and use all the reporting features. They can also see site notices in the app, so it’s easy to keep everyone in the loop.
Scanning in each day is also a good nudge to stay switched on about safety. The more we talk about it, the more we act on it, spotting hazards and taking care of each other.
It also helps you:
- Share the safety responsibility across the team.
- Look after lone workers by tracking check-ins.
- Keep a clear record in case there’s an incident or investigation.
Need help getting the team onboard? Try this:
- Use your next Toolbox Meeting to show everyone how to scan in with the QR code.
- Offer your team a Friday shout if everyone scans in all week.
- Make it part of your contracts and set that expectation from the start.
There’s no downside, scanning in is fast, easy, and helps everyone go home safe. Got questions? Get in touch with the HazardCo team. We’re here to help.
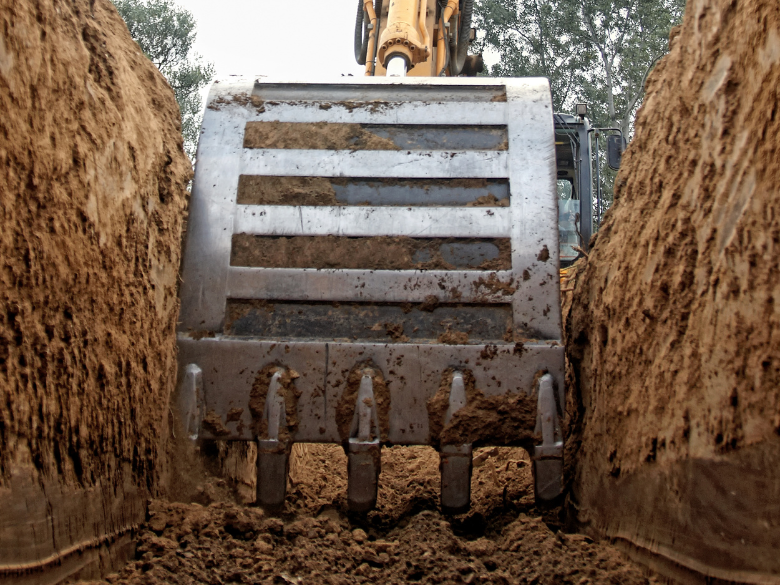
Working with heavy machinery and managing traffic on-site can be risky. But with the right checks and planning, we can keep everyone safe.
Daily machinery checks
Before starting work each day, make sure your equipment is ready to go:
Visual checks (before starting the machine):
- Check fluid and oil levels; look for leaks.
- Ensure tyres are free from damage and in good condition.
- Confirm safety mechanisms are in place and working.
- Make sure warning signs are visible and readable.
- Inspect attachments, clips, and pins for damage.
- Look over hydraulics for any issues.
Stationary function test (with the machine on):
- Test the horn and reversing alarm.
- Check that lights, pedals, and controls work properly.
- Move the bucket and arms to ensure they operate smoothly.
Moving function test:
- Test the steering.
- Ensure brakes are functioning correctly.
Using your manufacturer’s checklist or the HazardCo Heavy Machinery Prestart checklist can help you cover all these points.
Managing site traffic
Keeping vehicles and people safe on-site requires a solid traffic management plan. Here’s what to consider:
- Traffic direction: Plan routes for vehicles, cyclists, and pedestrians.
- Delivery areas: Set up clear zones and schedules for loading and unloading.
- Site layout: Define speed limits, traffic flow, and place barriers or fences where needed.
- Safe practices: Establish procedures for loading, unloading, turning, and reversing.
- Site restrictions: Be aware of noise levels and traffic volume.
- Unattended sites: Plan how excavations are managed when no one is around.
- Emergency procedures: Have clear steps in place for emergencies.
Discuss this plan during site inductions so everyone knows the rules and expectations.
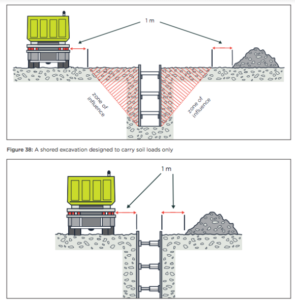
Know your limits: Zone of influence
Heavy machinery can affect the stability of excavations if operated too close. Keep all heavy vehicles, materials, and spoil at least one meter outside the zone of influence unless specific designs support closer operations.
Preventing tip-overs
Uneven ground can cause machinery to tip over, leading to serious injuries. To prevent this:
- Planning: Supervisors and operators should assess the area before work begins.
- SWMS: Make sure a SWMS has been prepared.
- Risk assessment: Operators should evaluate risks before starting each job.
- Safe routes: Choose the safest paths for moving machinery.
- Digging practices: Never dig underneath an excavator.
- Distance: Work at a safe distance from excavation edges.
- Procedures: Have standard operating procedures in place.
- Design: Ensure work areas are designed to control hazards.
- Safety features: Equip cabs with roll-over and fall-over protection; operators should wear seat belts and keep doors closed.
- Exits: Ensure there are always two exits from the excavation.
If you would like more information head over to our website or to chat with one of our friendly Advisory team please give us a call on 1800 954 702.
Looking for something in particular?

Summer’s here. Are you ready for the heat?
Longer days and sunshine make it feel like the perfect time to crack into work. But while summer brings good vibes, it also brings its own set of ri...

Kick off the New Year safely on site
The holidays are done and dusted, and it’s time to ease back into work. Reopening your site safely is just as important as shutting it down properly and t...

The Christmas break is nearly here. You're probably counting down the days until you can relax and spend some proper time with the family and friends.
But before you lock up for the holiday...

We’ve heard all sorts of myths and misconceptions when it comes to health and safety. We’re here to debunk some of the more common ones we hear.
H&S admin takes too long on-site...
MSDs (Musculoskeletal Disorders) are the most common type of work-related injury in Australia. In fact, over half of all serious workers’ compensation claims in construction back in 2024 were ...
Health in the construction industry is often overlooked, but it has a huge impact on workers and businesses. Physical and mental health issues are among the biggest reasons for time off work a...

Got lone workers on your team? Here’s what you need to know
If someone on your team is working by themselves without other people around and without direct supervision, they’re likely conside...
Take the Hassle Out of Toolbox Meetings.
Toolbox meetings don’t need to be a paperwork mission. With the HazardCo App, you can run quick, focused chats straight from your phone. No prep, no p...

Get your team scanning in and out – it’s a no-brainer!
We get it, health and safety chats aren’t always the most exciting. But they are the most important. When everyone on-site takes part,...
Working with heavy machinery and managing traffic on-site can be risky. But with the right checks and planning, we can keep everyone safe.
Daily machinery checks
Before starting work each da...

Demolition machinery
Working with heavy machinery can be dangerous. Incorrect use or untrained operators can lead to serious injuries or worse.
Training and supervision
Machinery sho...

Digging into the ground might seem straightforward, but excavation work is actually one of the most dangerous parts of construction. That’s why it’s important to plan ahead and put the right s...


