It’s that time of year again – the calendar’s full, the jobs are piling up, and everyone’s looking forward to a well-earned break. You’re pushing to get the last few projects over the line, finish the paperwork, and keep the team happy.
We get it. The end-of-year rush can be intense. But when the pressure’s on, it’s easy for safety checks to slide down the list. The focus shifts to finishing fast, not necessarily finishing right.
Before you pack up the tools and head home, take a moment to make sure your sites are still running safely and smoothly. A few minutes of care now can save you a whole lot of stress in the new year.
Don’t cut corners – check your corners
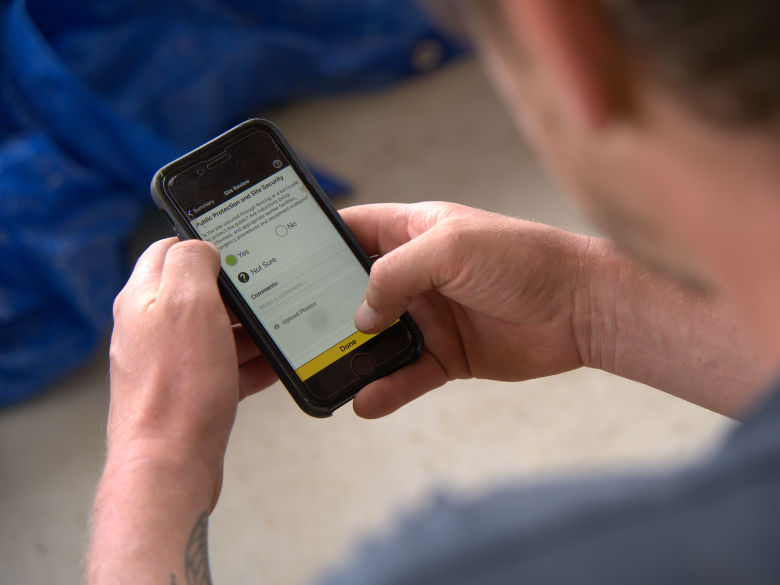
When things get busy, the best way to stay on top of safety is to make it simple. That’s where the Site Review feature in the HazardCo App comes in.
A quick walk around your site with a Site Review helps you spot what’s working well and what needs a tidy-up before the holidays. Think of it like your site’s end-of-year health check – quick, straightforward, and right there on your phone.
You can snap photos, add comments, and tick off areas as you go, so you’ve got a clear, time-stamped record of your site’s condition. It’s an easy way to confirm that everyone’s working safely, everything’s in order, and nothing’s been missed in the year-end rush.
And if you’re a business owner or site supervisor, it’s a great peace of mind, you’ll know your sites are in good shape while you’re taking that well-deserved break.
Get to know: Site Review
Not sure what to look for? No problem. The Site Review feature guides you step-by-step through what to check on-site, from tidy work areas and secured materials to the basics like PPE, access ways, and equipment condition.
It’s designed to make safety simple, even if you don’t have a dedicated health and safety person on your team. You’ll quickly see what’s running smoothly and what could use improvement, and you’ll have a clear, digital record you can refer back to anytime.
That means less guesswork, less paperwork, and fewer headaches when you come back in January.
Finish strong, start fresh
Before you shut down for the year, take a few minutes to complete a Site Review. It’s a small step that helps you wrap up confidently, knowing your sites are tidy, safe, and ready for a fresh start in the new year.
When you come back after the break, you’ll hit the ground running, not scrambling to fix what got missed in the rush.
So before you call it a year, do one last thing to protect your team, your reputation, and your business: run a Site Review in the HazardCo App.
You’ll finish the year strong, and start the next one even better.
HazardCo has partnered with Pointsbuild, one of Australia’s leading providers of online CPD and compliance training, to give HazardCo’s Complete members free access to the WHS Risk Management Training course, delivered by Pointsbuild.
This partnership is all about adding more value for HazardCo members and helping lift the standard of health & safety across the building industry. Together, we’re making it easier for builders and business owners to understand, manage, and reduce risk, because better knowledge means safer worksites and more confident teams.
Founded in 2007, Pointsbuild was Australia’s first approved CPD training provider for the Built Environment. Now offering nearly 200 courses and delivering more than 30,000 courses each month.
The one-hour online WHS Risk Management course takes HazardCo members through a systematic approach to identifying, assessing, controlling, and monitoring potential hazards and risks on-site. It covers:
- Risk identification
- Risk assessment
- Risk control
- Risk documentation, including SWMS
- Risk monitoring and review
- The WHS principle of consultation and communication
By joining forces, HazardCo and Pointsbuild aim to make it easier for members to upskill, improve safety outcomes, and confidently meet compliance obligations.
“We’re all about giving our members more tools to nail health and safety. Partnering with Pointsbuild means we can help our members upskill and strengthen their approach to risk management, which ultimately raises the bar for the whole industry.”
– Iain Dixon, HazardCo CEO
“Our collaboration with HazardCo brings together two organisations focused on practical learning and improving health and safety outcomes in the construction industry. We’re proud to support HazardCo members with accessible, industry-relevant training that builds safer worksites and more confident teams.”
– Michel Tomlinson, PointsBuild Managing Director
The Risk Management Training, delivered by Pointsbuild, is available to HazardCo’s Complete members. Get in touch with the team to find out more.
Every year in September, people around the world mark Global Deaf Awareness Week (22–28 September 2025). It’s a chance to recognise the importance of communication, accessibility, and inclusion for the Deaf community. For those of us working in construction, it’s also the perfect reminder of how precious our hearing is, and how easily it can be damaged by the noise we’re exposed to every day.
Noise: The silent risk on-site
Power tools, heavy machinery, vehicles, and hammering – the soundtrack of a busy site is loud. And while it might just feel like “part of the job,” that constant exposure can take a serious toll on your hearing over time.
Noise-induced hearing loss (NIHL) happens when loud sounds damage the sensitive structures in your inner ear. Depending on the type and extent of damage, NIHL can be temporary or permanent. The good news? Unlike many other forms of hearing loss, NIHL is entirely preventable.
It’s also very common. According to Safe Work Australia about 28–32% of Australian workers are exposed to loud noise at work. People who work in noisy industries, like construction, agriculture, carpentry, mining, oil and gas, and the military, are especially at risk.
How loud is too loud?
You might be surprised at just how quickly noise becomes dangerous. Here are some benchmarks:
- 85 decibels (dB): About as loud as heavy traffic. Safe for around 8 hours.
- 100 dB: A chainsaw or jackhammer. Damage can occur after just 15 minutes.
- 110 dB+: A nail gun or rock concert. Even a few minutes without protection can cause permanent damage.
On a construction site, these levels are reached every day, sometimes without us even realising.
Symptoms of Noise-Induced Hearing Loss
Hearing loss doesn’t usually happen all at once. Symptoms can creep up slowly, which is why many people don’t notice until it’s too late. Some of the most common signs of NIHL include:
- A feeling of fullness or pressure in your ear.
- Inability to hear high-pitched sounds, like birds singing.
- Muffled or distorted speech, making conversations harder to follow.
- Tinnitus – ringing, buzzing, or roaring in the ears.
There are two main types of NIHL:
- Acoustic trauma: Instant hearing loss from one very loud, forceful and sudden sound (like a gunshot or firecracker). This damage is often permanent.
- Chronic NIHL: Gradual hearing loss from repeated exposure to loud sounds over time (like noisy worksites or even loud headphones). It can take weeks, months, or years before you notice the problem.
Beyond the job: The personal impact of hearing loss
Hearing loss doesn’t just affect you at work. It changes your whole life.
- Conversations become harder. Background noise makes it tough to follow what’s being said.
- Social situations can feel isolating. It’s easier to avoid gatherings than struggle to keep up.
- Confidence takes a hit. Many people with hearing loss feel self-conscious about asking others to repeat themselves.
- Relationships are impacted. Miscommunication and frustration can creep in with family and friends.
And the effects don’t stop there. Untreated NIHL has been linked to:
- Anxiety and depression.
- Fatigue and insomnia from straining to hear.
- High blood pressure, increased heart rate, and stress.
- Irritability and hyperacusis (heightened sensitivity to sound).
In short, it doesn’t just change what you can hear, it changes how you live, connect, and feel day to day.
Protecting your ears on-site
The good news is, hearing loss from noise exposure is 100% preventable. Here’s how:
- Wear the right protection: Use earplugs or earmuffs that are rated for the noise level you’re working in.
- Use quieter equipment when possible: Look for low-noise models or maintain tools well to reduce noise output.
- Create quiet zones: Step away from noisy work regularly to give your ears a break.
- Check the levels: Ask a competent person to come in and complete a detailed noise assessment.
- Check out our blog here for more ways to manage noise on-site
What to do if you’re concerned about your hearing
If you think you might already be experiencing signs of NIHL, don’t ignore it. Talk to your primary care physician or healthcare provider – they can refer you to an audiologist (hearing specialist) or otolaryngologist (ear, nose, and throat doctor) for further tests.
Specialists use a range of hearing assessments to diagnose NIHL and check if there are any other contributing factors. Getting tested early is important: even if hearing loss can’t be reversed, the right support and treatment can help you manage symptoms, protect the hearing you have left, and improve your quality of life.
Take action this September
This week, let’s not just raise awareness, let’s take action. Protect your hearing, look out for your team, and start conversations about noise on-site.
Because hearing isn’t just about safety at work. It’s about being able to connect, laugh, share stories, and enjoy life for years to come.
Picture this: you’re starting another day on site, and you’re heading out to your work area. You notice a ladder leaning against the wall, but one of the rungs looks cracked. A few metres away, someone’s left a pile of timber stacked a little too high, and the wind’s picking up. None of it looks like a disaster on its own, but these are the small things that can add up to a serious injury if no one speaks up.
That’s the reality of construction sites. They’re full of moving parts, changing conditions, and plenty of ways things can go wrong. A hazard is simply anything that could hurt you or someone else on-site. The trick is learning to spot them before they turn into incidents. Once you know what to look for, it becomes second nature, like checking your mirrors before pulling onto the road.
The dangers that hide in plain sight
Some hazards are obvious, like a roof edge without guardrails or a live wire dangling where it shouldn’t be. Others are subtle. Falls are one of top causes of serious injuries on building sites, and they don’t just happen from rooftops. A wobbly ladder, a scaffold missing a plank, or even a wet surface after overnight rain can quickly lead to a fall and serious injury.
Then there’s the danger of being struck by something. A tool dropped from above, a reversing vehicle in a blind spot, or a swinging load from a crane, these moments happen in an instant and can change lives forever. Electricity brings its own set of risks. Damaged cords, overloaded circuits, or working too close to power lines are all hazards that can cause serious harm in an instant.
And it’s not always about dramatic moments. Sometimes it’s the slow-burn hazards that do the most damage: breathing in dust or silica dust particles day after day, being exposed to paint fumes, or dealing with asbestos in an old structure. They might not knock you down on the spot, but they can cause long-term health issues that no one wants to bring home.
How to get better at spotting hazards
So how do you get good at seeing hazards before they catch you out? It starts with building a habit. Each morning, take a few minutes to conduct a safety walk around the worksite. Look at what’s changed since yesterday. Is there new equipment? Has the weather caused damage? Are materials stacked differently? That quick scan can save you from nasty surprises later in the day.
Make it part of your day
Hazard spotting isn’t something you do once and tick off. It’s an all-day habit. At the start of your shift, scan the site. During the day, keep checking, especially after breaks or when conditions change. At the end of the day, tidy up, secure materials, and make sure barriers are still in place. That way, the next crew isn’t walking into danger before they’ve even started.
And when you do find something? Don’t wait. Stop what you’re doing, warn others, and report it. Even better, document it so there’s a record, because the last thing anyone needs is for the same hazard to crop up tomorrow.
It’s everyone’s job
Here’s the thing: safety isn’t just the job of the person with the clipboard. Everyone on-site can use their awareness and judgement to spot hazards. The people who make the biggest difference are the ones who keep asking “what if?”, who don’t rush past something that looks dodgy, and who aren’t afraid to speak up. Passing that mindset on to new workers is how you build a strong safety culture.
Where HazardCo fits in
Of course, knowing how to spot hazards is one side of the story. Keeping track of them and making sure they’re fixed is the other. That’s where HazardCo makes life easier. Instead of scribbling notes on scraps of paper or trying to remember everything until you see your supervisor, you can log hazards in the app as soon as you spot them using our Site Review feature in the HazardCo App. The system guides you through each step, so nothing falls through the cracks.
Site Supervisors see updates instantly, workers know what’s being done, and the whole process is clear and simple. No chasing paperwork, no confusion, just a guided way to manage hazards that gives everyone peace of mind.
Putting it into practice
Next time you’re on-site, take 10 minutes to really look around the area. What’s stacked where? What’s changed since yesterday? What could go wrong, and what could you do to make it safer? That small step is the start of a habit that keeps you and your crew safe.
And if you want a system that doesn’t just leave hazard spotting up to memory or luck, HazardCo’s got your back. With our guided approach, you’ll have everything you need to identify, report, and track hazards with confidence. Because at the end of the day, safety isn’t about ticking boxes, it’s about making sure everyone goes home safely at the end of the day.
Respiratory Protective Equipment (RPE) is a critical layer of defence for workers exposed to airborne hazards like dust, fumes, vapours, But not all RPE offers equal protection, and even the best equipment won’t keep you safe if it doesn’t fit properly, isn’t suited to the task and things it’s filtering, or isn’t well maintained.
Here’s what you need to know about getting RPE right, from upfront fit testing to choosing the right cartridges, to regular check-ups and health monitoring.
Step 1: Get Fit-Tested – One Size Doesn’t Fit All
Before a worker ever steps into a hazardous area, they need to be fit tested for the right RPE. Why? Because no two faces are the same. RPE comes in different sizes typically ranging from Small to Extra Large, and a poor fit can mean poor protection, even if the mask looks like it fits.
Key considerations:
- Fit testing is essential for “negative pressure” RPE like half-face or full-face respirators.
- Fit testing ensures that the mask seals properly and provides effective protection.
- Facial hair, even stubble, will destroy that seal. If workers choose to keep facial hair, consider positive pressure powered respirators that don’t rely on a tight face fit. But be aware they carry more cost and size.
Fit testing must be:
- Conducted before first use of RPE.
- Repeated at least annually, or whenever the wearer’s face shape changes, due to weight loss/gain, dental work, surgery, or injury.
- This is done with qualitative (using taste or smell) and quantitative (using specialised equipment), and is performed by a competent person trained and certified in how to do it.
Fit testing is also a great opportunity to train workers on how to wear and check their masks properly, which brings us to the next step.
Step 2: Choose the Right RPE for the Risk
Not all filters protect against all hazards. It’s essential to choose RPE that’s targeted to the type of contaminant and the task at hand.
Types of RPE include:
- Disposable respirators – These are light and easy to use for short periods and should only be used with other effective controls in place. While they don’t need maintenance, they still require fit testing. Disposable masks should not be used as the main form of protection, and you may need to follow strict rules from the Regulator for certain tasks.
- Reusable half- or full-face respirators (negative pressure systems) – used with interchangeable cartridges that target specific hazards.
- Powered Air Purifying Respirators (PAPRs – Positive pressure systems) – provide more filtered air than you can breathe to keep any contaminants away from your breathing zone, these can be more comfortable for long term wear as they keep fresh air moving over you.
- Supplied air respirators – used only in high-risk environments where there isn’t oxygen in the atmosphere, they can be “supplied” which uses a compressed air line to the set or a “self contained” system like you see fire fighters use.
To get this right, consider:
- What is the form of the contaminant? Dust, gas, mist, or vapour? Each requires a different filter or cartridge type.
- What do the Safety Data Sheets say? (SDS) Can you get an SDS for the substances you’re working with? And what do they recommend?
- What level of activity is involved? Light vs heavy work, short vs extended durations, confined spaces – all affect your choice of gear.
- Is the RPE compatible with other PPE (like safety glasses, helmets, or earmuffs)? Full face respirators are far better than half face ones as they also protect your eyes from the dust and chemicals.
- What level of comfort is needed? If RPE is uncomfortable, workers are less likely to wear it correctly or consistently.
Important: Choosing the wrong size or type of RPE will give the illusion of safety, while leaving workers dangerously exposed. There is a world of difference between “looks safe” and “is safe”
Step 3: Maintain the Protection Over Time
Once the right gear is chosen and correctly fitted, the work doesn’t stop. RPE needs to be maintained, checked, and re-evaluated regularly.
What ongoing checks are needed?
Daily visual inspections
Before each use, workers should inspect their gear for cracks, tears, wear, or contamination. Damaged RPE should not be used.
Filter and cartridge replacement
There’s no one-size-fits-all rule for changing filters – check with your manufacturer. Never rely on smell or taste to know if filters are still working – by the time you smell something, it is already damaging you.
Annual fit testing
Our faces change over time. Even subtle shifts in weight or facial structure can impact the mask’s seal. Yearly testing is the recommended standard.
Proper cleaning and storage
Dirty or improperly stored RPE may not perform when needed. Train workers on cleaning routines and ensure hygienic storage.
Don’t Skip Health Monitoring
Even with the best gear, health monitoring plays an essential role in a full respiratory protection programme. It’s how you check whether control measures (like RPE) are really working, and catch signs of harm early.
You’re required to monitor workers’ health if they’re exposed to substances that pose a serious health risk.
Health monitoring can include:
- Medical exams to ensure workers are fit to wear RPE.
- Regular checks if there’s known long-term exposure to hazardous substances.
- Investigations if symptoms or health concerns arise.
Final Thoughts: Protecting People, Not Just Ticking Boxes
RPE isn’t just a piece of kit, it’s a commitment to keeping people safe. By following these three steps:
- Upfront fit testing
- Choosing the right RPE and cartridges for the job
- Ongoing maintenance and health checks
You’re doing more than following regulations. You’re creating a culture where safety is personal, proactive, and properly managed.
The right mask, worn the right way, backed by the right training and monitoring – that’s how you keep your team safe.
Managing safety on-site is no small task, especially when high-risk construction work is involved. Whether you’re working at heights, operating heavy machinery, or managing airborne contaminants, having a clear plan in place to identify and control hazards is essential.
That’s where HazardCo’s SWMS with Risk Matrix comes in.
This new feature goes beyond the basics of a standard Safe Work Method Statement (SWMS), giving you clearer documentation and stronger risk management. With a built-in Risk Matrix, you can better assess the likelihood and impact of potential hazards and demonstrate exactly how you’re reducing risk on-site.
What’s New
With SWMS Risk Matrix, you now have access to a built-in Risk Matrix that helps you make more informed, structured decisions. A risk matrix enables you to evaluate hazards based on two key factors:
- Likelihood – How likely is it that someone could be harmed?
- Consequence – How severe would that harm be if it occurred?
By visually mapping out risks before and after control measures are applied, the risk matrix helps you plan more effectively, communicate more clearly, and maintain stronger safety records.
When would you use a Risk Matrix – and why?
A risk matrix is often required when pre-qualifying or tendering for government or large-scale projects, where robust and detailed safety documentation is expected by the Principal Contractor and Clients.
But that’s not the only time it comes in handy.
A Risk Matrix is also useful in day-to-day operations, for example:
- During an incident investigation or after a near miss
- During project planning
- When scope, design or schedule changes are introduced
- As part of Toolbox Talks
They help you reassess risks, update control measures, and engage your team in actively identifying and managing site-specific hazards.
Using a Risk Matrix provides clear evidence that hazards have been properly assessed and managed, making your SWMS easier to understand and more effective for everyone involved.
It allows you to:
- Visually demonstrate risk levels before and after controls
- Prioritise actions and communicate risks to your team
- Meet your Health & Safety duties with a structured risk review
- Improve on-site decision-making and planning
Why Use SWMS with Risk Matrix?
Here’s why SWMS with Risk Matrix is a valuable addition to your safety toolkit:
- Stay compliant with ease – Meet your health and safety obligations with a structured approach to hazard identification and control.
- Make informed decisions – Assess risks at a glance and take action before work begins.
- Save time on paperwork – SWMS with Risk Matrix simplifies risk evaluation.
- Improve safety documentation – Maintain a clear record of hazards and controls to support better safety outcomes.
- Flexibility when you need it – When you need extra detail, like during a tender or prequalification, SWMS with Risk Matrix gives you the tools to deliver.
How to Access SWMS with Risk Matrix
SWMS with Risk Matrix is available on our Premium and Complete subscription plans.
If your jobs involve high-risk construction work, complex planning, or requires you to submit detailed documentation for tenders or prequalification, this tool is made for you
A common question we hear is, “Do I need to fence my worksite?” The answer isn’t always straightforward. Every worksite is different, and you need to think about a few key factors to get it right.
If you’re responsible for the site, it’s up to you to make sure it’s secured from unauthorised access. A fence can help keep hazards separate from the public, but how do you know if you need one?
Ask yourself:
- Are there pedestrians nearby?
- Is there a car park close to the site?
- How close are neighboring buildings?
- Are there other worksites or recreational areas nearby?
- Is there a school or childcare center close by?
- Are there homes in the area?
- What hazards are on-site, and how long will they be there?
- How accessible and visible is the site?
When deciding to fence your worksite, consider the risk factors mentioned above. If any of these are present, a fence should be used. If you can’t secure the site, you will need to enclose specific hazards when workers are not present eg. overnight
A proper worksite fence should:
- Be at least 1.8 metres high on any side accessible to the public
- Be securely constructed using counterweights, baseplates, fittings and clamps, with no weak points for potential entry. Additional bracing will be needed if your site is not level
- Be installed according to manufacturer specifications
- Be built strong enough to withstand high winds and unstable ground without collapsing
- Be difficult to climb and crawl under.
These standards ensure the fence is strong, secure, and meets general safety requirements.
Excavations
If you have excavations on-site it’s important to think about how long the excavation will remain exposed. If the excavation is going to be left unattended overnight, you should consider:
- Covering it with plating
- Fully enclose it with a safety fence
- Backfilling it to remove the hazard
Simple barricades, cones, plastic mesh netting without a solid frame, and hurdles are not enough to protect against excavation hazards. A proper safety fence is the best choice for long-term or unattended worksites with excavation risks.
Remember, when you’re away from your worksite, it’s important to protect people from hazards they might not be aware of. Simply putting up a sign is not enough. Blocking access and protecting everyone from excavation dangers shows that you’re effectively managing the risks.
You can use our handy Site Security Checklist to make sure your site is in order when it’s left unattended. If you have any questions, don’t hesitate to call HazardCo on 1800 954 702.
When it comes to working at height, understanding the difference between fall prevention and fall arrest is critical. Fall prevention, also called fall restraint, stops you from being able to fall in the first place. Think of it as keeping you safely away from the edge. Fall arrest, on the other hand, is a backup plan, it doesn’t prevent the fall from happening, but catches you if one happens, reducing the risk of death to injuries that are survivable, depending on what you hit.
This blog explores fall arrest systems, covering the gear, techniques, and best practices to prevent falls or reduce injuries if a fall happens. Remember, no matter which type of equipment you use it has to be added into your SWMS. To make it even easier to follow, we’ve included short videos demonstrating each step. Let’s break it all down.
Is Your Gear Rated and Reliable?
Not all gear is created equal! In fall arrest situations, quality isn’t optional – it’s life-saving. In Australia and New Zealand, fall arrest equipment must meet at least AS/NZS Standards.
Before anything else, confirm that your equipment complies with these standards, and if it’s something else like EN or ISO standards stop and ask questions, if you’re not sure who to ask then call us on 1800 954 702. Look for labels or certifications and ensure you’re using gear designed for fall arrest and not just general-purpose climbing equipment, because yes, there is a big difference!
Start at the Foundations: Anchors
A fall arrest system is only as strong as its weakest point. Just like building a house, the foundation must be solid. Your anchor point must be able to withstand the forces generated during a fall – this typically means being rated for at least 15kN (1,500kg) for 1 person 21kN (2,100kg) for 2 people.
Ask yourself:
- Is the anchor secure and in good condition?
- Can it handle the load of the system and any potential forces from a fall?
- Is it in the best place for your tasks, will it cause me to pendulum/swing?
Connectors: Small but Critical
Connectors are often overlooked, but they’re a vital part of your system. Use auto-locking karabiners over traditional screw gates – they’re faster to secure and less prone to accidental opening. As can be seen in the video showing the differences between manual and autolocking gates.
Be mindful of your connector positioning to avoid “roll-out.” Roll-out occurs when a karabiner rotates under pressure, such as a fall! Forcing the gate open. The video here should get you thinking…. Am I actually protected? Or do I just look protected?
The key takeaway is to ensure:
- Gates are locked and orientated with thought given to how the loads would shift.
- Connectors are checked for damage or wear before use.
What’s Between You & Your Anchor?
When selecting the thing between yourself and the anchor, you have three main options:
- Rope: Lightweight and flexible, ideal for most situations. You can also add knots in the line to prevent you from reaching a place where a fall is possible.
- Webbing: Lightweight and strong, but susceptible to cuts, heat, UV/sun damage, and abrasion, this cannot be knotted or tied to help you set limits.
- Steel wire: Highly durable, suited for harsh environments but less forgiving on weight and movement.
Each material type has its unique advantages and limitations, so consult an expert if you’re unsure about the best choice for your work situation.
Fall Arrest Devices & Shock Absorbers: The Brakes on Your System
Fall Arrest Devices come in 3 types. Most commonly you will see the “roofers kits” in the safety shops, these have a type 1 device that will move towards your anchor but not away from it without your input.
A type 2 is much like a seatbelt, they are Self Retracting Lanyards also known as SRLs, these are pretty easy to understand, and they will have their limitations printed on the device.
Type 3 fall arrest devices are like type 2 but the key difference is that they are retractable, these are what most people use for confined space entries where the entrant may have to be “winched” to safety if they pass out
All Lanyards that are the link between you and the device must include a shock absorber also known as a personal energy absorber. It’s like the brakes on a car, it slows your fall gradually, reducing the impact on your body. Without one, it would be like using a concrete wall to stop your car! Stopping that fast can generate forces over 4kN (400kg), which is enough to seriously injure or even kill by doing serious damage to your neck.
Shock absorbers are designed to limit the force put through your body to less than 4kN (400kg), protecting your neck, spine, and internal organs.
Harness Fit: Where Comfort Meets Safety
Your harness is a major piece of the puzzle, and proper fit is everything! Harnesses come in different sizes (S, M, L, XL), so check the manufacturer’s instructions for their size chart to ensure it’s the right size so you can fit it properly.
Key fitting tips:
- Sub-pelvic strap: This you will see in the video, it’s the link between the two leg loops. It must sit at the junction of your butt cheek and hamstring. This way the strap spreads force like a seat, if it’s not positioned right then guess where all the force goes…
- Chest attachment (front): Align around your nipple line.
- Dorsal attachment (rear): Should sit between your shoulder blades with straps forming an “X.”
- Leg straps: Tight enough to fit a flat hand under while standing, but not loose enough to pull a clenched fist through.
A poorly adjusted harness can turn a fall arrest into a painful or life-threatening situation.
Tethering your Tools
When working at height, it’s not just your safety that’s at stake – it’s the safety of everyone around you. One small slip of a tool can lead to serious injuries, property damage, or expensive delays.
Here’s why it matters:
- Preventing Falls & Protecting Others: When you’re working at height, dropping a tool isn’t just inconvenient – it’s dangerous. Tethering your tools ensures that if something slips from your grip, it won’t fall far, keeping you and everyone below safer.
- Saving Costs: Tool tethering doesn’t just protect people; it protects your budget too. It helps avoid costly tool replacements and prevents damage to equipment or work areas caused by falling tools.
Don’t Forget Your Head!
In fall arrest scenarios, gravity isn’t your friend! Because your fall is uncontrolled, there’s the risk of striking whatever objects are in your path on the way down. A standard hard hat simply won’t cut it here. Use a safety helmet with a modified chin strap to keep it securely in place during a fall. A good helmet can make all the difference between walking away and serious injury that stays with you for life.
Final Thoughts: Safety Is in the Details
Setting up a fall arrest system isn’t just about having the right gear or looking good.
It’s about understanding how each component works together to keep you safe. Follow the steps above, inspect your equipment regularly, don’t cut corners, and never work alone when using harnesses as you will need a solid rescue plan!
If you’re unsure about which equipment is right for your situation or need help finding out about setting up your systems, get in touch with our qualified H&S advisors.
It’s better to ask questions now than face the consequences later.
We are here ready to talk when you are 1800 954 702
advisory@hazardco.com
Knowing the difference between confined spaces and restricted spaces is important for keeping everyone safe. Both can be risky, but they’re treated very differently when it comes to safety rules and legal compliance. Let’s break it down.
What Is a Confined Space?
A confined space is a space that:
- Is enclosed or partially enclosed: Think of tanks, silos, pits, or pipes.
- It isn’t meant for people to be in generally: It’s built for storing stuff, not for humans to work or stay in.
- Has serious risks inside, such as:
- Not enough or too much oxygen
- Dangerous gases or fumes that can cause you to lose consciousness or suffocate.
- Risk of fire or explosions from the gases or fumes.
- Risk of being engulfed/drowned or trapped by materials, whether they are free-flowing solids or liquids.
Once a space is a confined space, it stays a confined space unless all these risks are completely removed—permanently! Temporary fixes, like extra ventilation or gas testing, don’t change its classification, they are simply controls you put in place to protect yourself if you have to enter it.
Safety Steps for Confined Spaces:
Because working in confined spaces is classed as high-risk construction work, there are strict rules that will need to be followed:
- Plan the work: Prepare a SWMS before starting the work.
- Entry permit: Make sure you get an entry permit before going into the confined space.
- Rescue Plan: You need a plan for getting workers out safely in case something goes wrong. The plan should also be rehearsed to make sure it is efficient and effective.
- Testing the Air: Check for oxygen levels, gases, or other dangers before going in, and once entry occurs you must monitor the atmosphere for any changes.
- A Stand-By Person: Someone must stay at the entrance to monitor and communicate, this is the most experienced person and they are in control.
- Special Training: Everyone working in or around the confined space, especially the stand-by person, must have proper training such as Basic or Advanced Confined Space Entry, and Breathing Apparatus Course.
There may also be others, depending on the risks associated with the space.
What Is a Restricted Space?
A restricted space is less dangerous but still has risks. It’s an area that:
- Is tricky to get in and out of: It has small or awkward entry points.
- Isn’t big enough: There’s not enough room for someone to work comfortably.
- Might have other hazards, like asbestos dust, mould etc.
While restricted spaces aren’t always as risky as confined spaces, it’s still important to assess the situation carefully and take the right precautions for what you’re doing as they can present challenges and risks like slips/trips and body strain.
Key Difference
The big difference is that confined spaces are always classified as confined spaces, even when “controlled” for an entry, as their risks can’t be permanently removed. Restricted spaces don’t have the same risks related to air quality and risks of engulfment as confined spaces do. Confined spaces always need an entry permit and a rescue plan in place.
Need Help?
If you’re a HazardCo member and you’re unsure about a space on your site, we’re here to help. Our qualified H&S advisors can give you advice specific to your situation.
Call us on 1800 954 702 or visit www.hazardco.com for more information.
Emergencies and natural disasters can happen anytime. Although you can’t predict when they will happen, you can take actions to make your business more prepared.
Do you and your workers know what to do if a disaster strikes?
An emergency plan is a health and safety requirement necessary for keeping everyone safe, and not having one is a big risk for your business and your workers.
Your emergency plan should include the following:
- Emergency procedures for fire, flood, and other hazards.
- Designated assembly points, wardens, and first aiders.
- Contact information for staff, suppliers, and clients.
- Alternative arrangements if you are unable to access your premises
What to consider when making an emergency plan:
When working out your emergency plan, you must take into account:
- The size and location of your workplace
- The number of workers
- The nature of the work being carried out and the workplace hazards
- The types of emergency situations your workplace may face
Maintaining and testing emergency plans:
A well-maintained emergency plan should be reviewed and updated when:
- There are changes to work activities or the physical workplace
- Workers with emergency responsibilities change
- New risks are identified.
Testing your emergency plan is important to ensure it works:
- Testing can be as simple as thinking of a scenario (e.g. a fire) and staging a mock emergency, such as a fire drill to test how well the plan works.
- Following any testing, a review should be conducted to identify areas for improvement or updating. This should include seeking and considering feedback from your workers
Worker Engagement
Involve workers in emergency planning and decisions. All workers should know who is responsible for activating and coordinating emergency procedures and what they must do to keep themselves and others safe in an emergency.
First Aid Kits and Fire Extinguishers
Having first aid kits and fire extinguishers readily available ensures that workers can quickly address emergencies, potentially saving lives and preventing extensive property damage.
Keeping you and your workmates safe at work is a top priority, so it’s important to understand what your business needs for an effective emergency plan. Make sure you’re aware of these requirements to help keep everyone safe!
Use the handy templates available in the Hub to help you document your plan and drills so you can be prepared for any emergency situation. Find these below:
If you would like more information, get in touch with our friendly HazardCo team – we’re always happy to help!
Looking for something in particular?
It’s that time of year again - the calendar’s full, the jobs are piling up, and everyone’s looking forward to a well-earned break. You’re pushing to get the last few projects over the line, fi...

HazardCo has partnered with Pointsbuild, one of Australia’s leading providers of online CPD and compliance training, to give HazardCo’s Complete members free access to the WHS Risk Management ...

Every year in September, people around the world mark Global Deaf Awareness Week (22–28 September 2025). It’s a chance to recognise the importance of communication, accessibility, and inclusio...
Picture this: you’re starting another day on site, and you’re heading out to your work area. You notice a ladder leaning against the wall, but one of the rungs looks cracked. A few metres away...

Respiratory Protective Equipment (RPE) is a critical layer of defence for workers exposed to airborne hazards like dust, fumes, vapours, But not all RPE offers equal protection, and even the b...

Managing safety on-site is no small task, especially when high-risk construction work is involved. Whether you're working at heights, operating heavy machinery, or managing airborne contaminan...

A common question we hear is, "Do I need to fence my worksite?" The answer isn’t always straightforward. Every worksite is different, and you need to think about a few key factors to get it ri...

When it comes to working at height, understanding the difference between fall prevention and fall arrest is critical. Fall prevention, also called fall restraint, stops you from being able to ...

Knowing the difference between confined spaces and restricted spaces is important for keeping everyone safe. Both can be risky, but they’re treated very differently when it comes to safety rul...

Emergencies and natural disasters can happen anytime. Although you can’t predict when they will happen, you can take actions to make your business more prepared.
Do you and your workers kno...


